
If your TD or TF, like most others, has been refinished a number of times some of the little details may have been lost. In fact you may not even know they exist unless you have compared your car to another. The details I refer to in this section are found in the form of plates, etchings, emblems and decals. These decals and etchings were part of plates from the MG Car Company or their suppliers. Some of these are available as replacement parts and offer good substitutes. Many of these parts are not available or perhaps just need to be restored.
Within these pages I will describe these decals and etchings and provide a digital image of the item so you can create your own or restore the etching on your original part. I will also describe how you might go about the etching process or where you could have this done. The items that I deal with in these pages are:
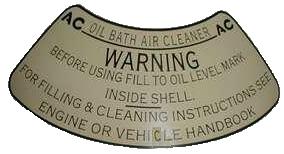
This decal was affixed to the top of the smooth topped air cleaners. Note the image is not full size.
Found on some of the late model TD's. Contact Rob for more information about the decal.
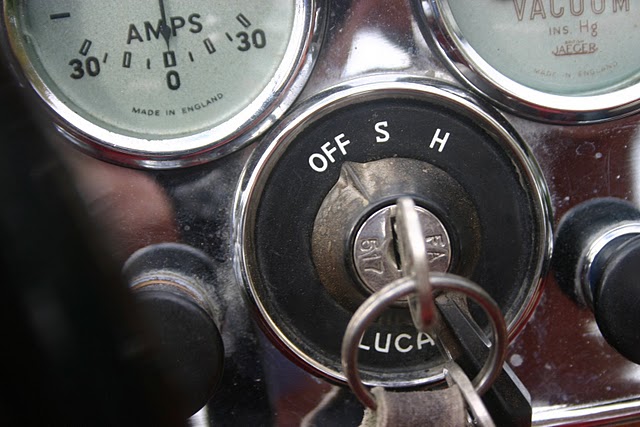
The bezel surrounding the ignition key turns on/off the side lamps, taillamps and headlamps. These letters depict the position of the switch at the top (OFF S H). At the bottom is the manufacture, LUCAS. Note the unique character of the "U" and "A" in LUCAS.
To restore these bezels you will firt have the have the bezel outside edge chrome plated. Then carefully mask off the outside edge with painters tape and lightly sand the flat portion. Spray lightly with primer and then black semi gloss paint. Once dry you will apply the lettering.
The best method of letter is using dry transfer followed up with a comptable clear semi gloss finish with your black paint. Unfortunately you will not be able to find a commercial lettering set in dry transfer and will have to make your own. You can print the transfer letters on "dry transfer" sheets in an ink jet printer. The best font to use is from Adobe and is named Parisine Plus Std Sombre Regular. The U is even correct. Pick whatever weight you like best.
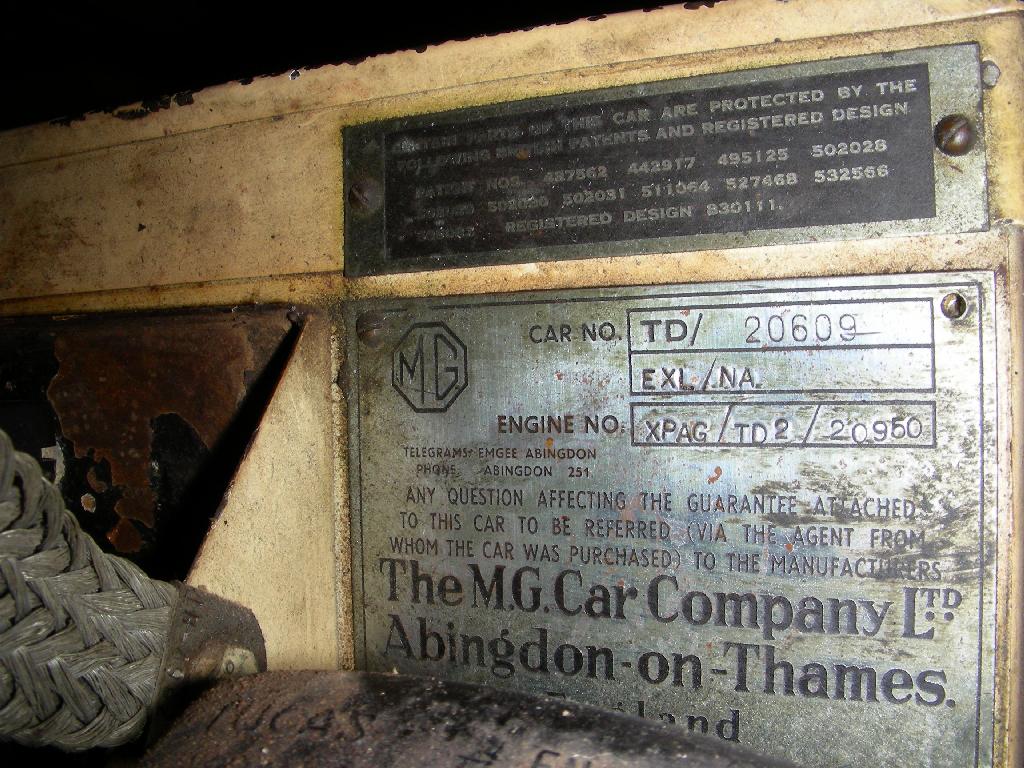
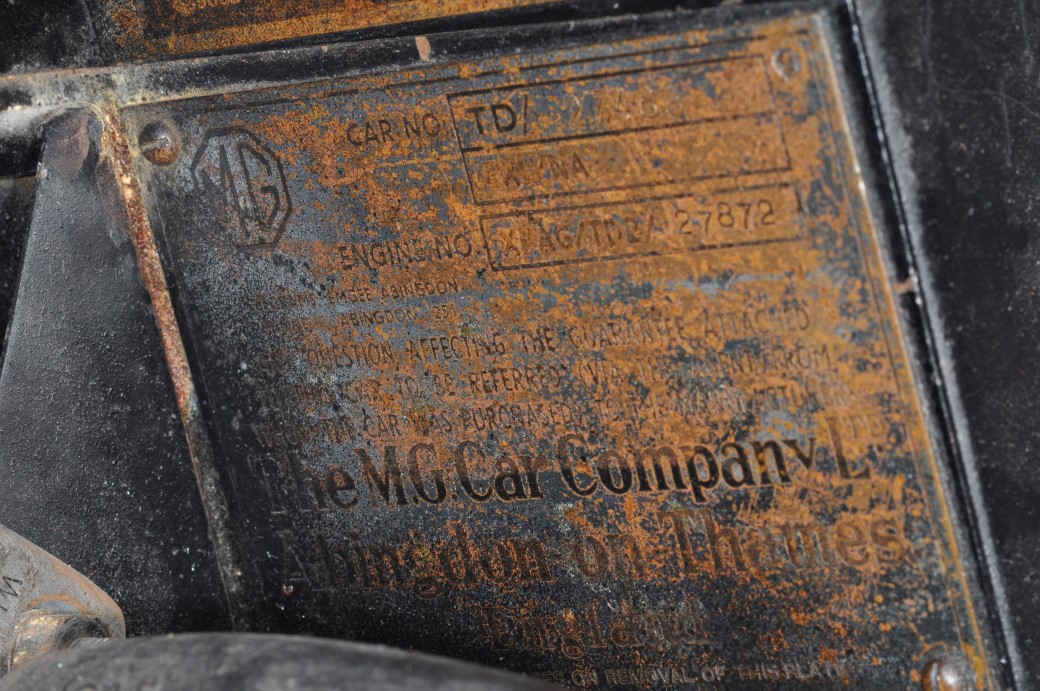
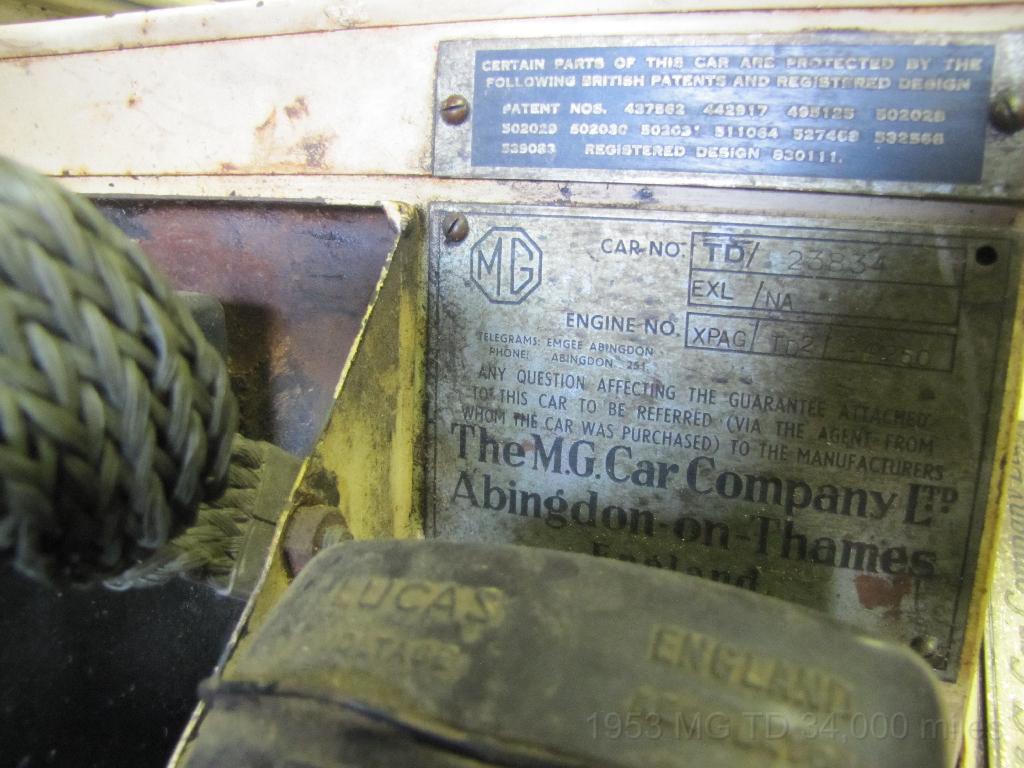
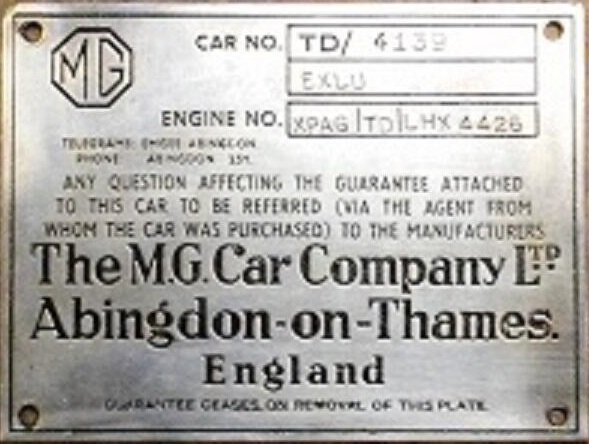
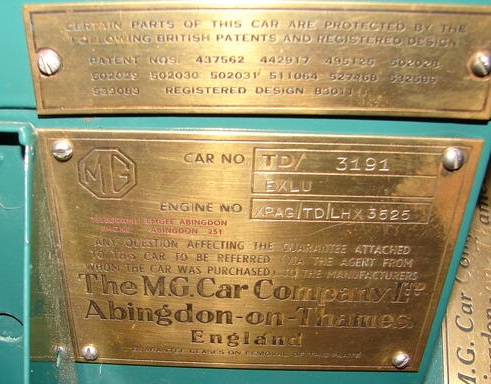
All TDs have brass plates that are nickel plated. The plates are overall etched including the TD/ before the car number. The car number is hand stamped. The export and engine number stuff is hand stamped along with the car number. It appears that the car number is stamped with a different stamp than the export and engine data. Obviously done at a different time.
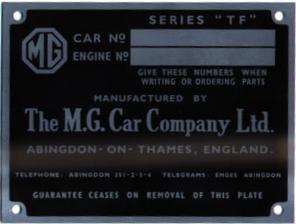
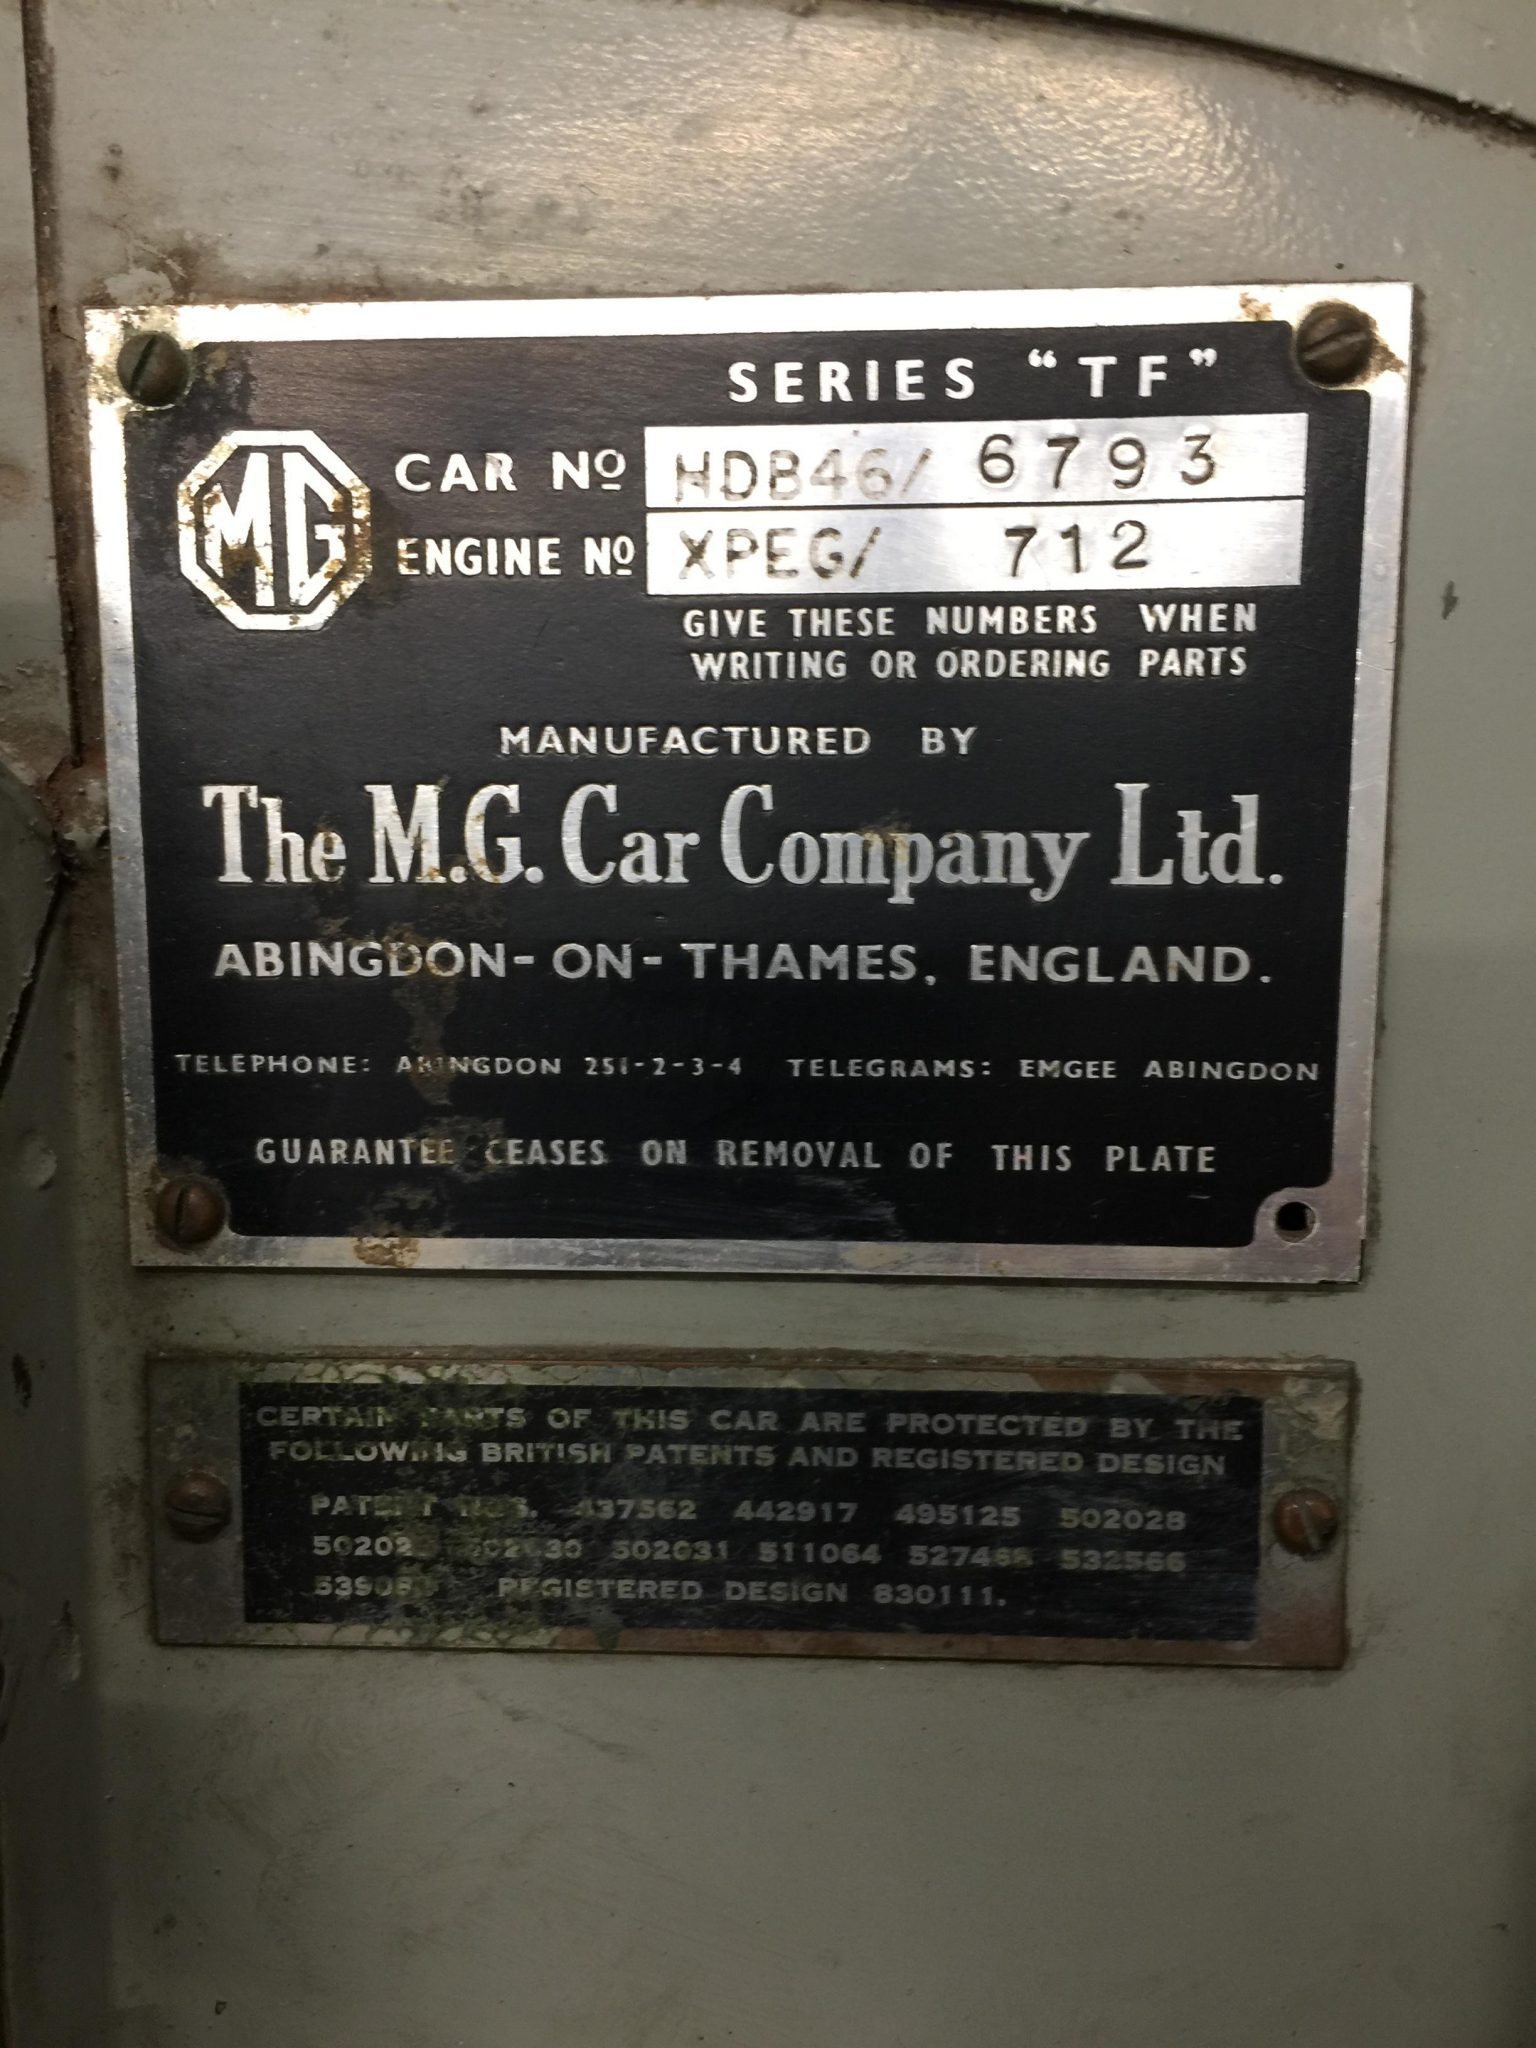
The TF car plate is different from the TD. It is NOT brass, but aluminum. It is also reversed in that the background is black vs the plate base. Here is also another difference: Where the TD uses some etching (ie the TD/ preceding the car number), the TF seems to use engraving. You can notice the difference between the more static (batch information) such as color code, export information, engine type, which is engraved vs the car number and engine number which are stamped. If you compare the TF engraved letters to the etched and stamped ones you can see they are aligned perfectly but have a bit of a rough texture vs the engraved letters. This makes sense when you understand that the TFs were built in batches of colors (and probably with it export location), so they could pre plan these plates. Tom Lange and I are working on these batches. You can see our work in progress here.
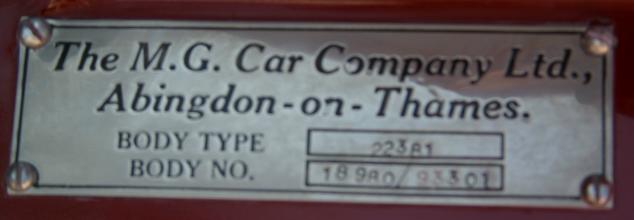
The TF body number and patent plates are also nickel plated on brass. All numbers on the body plate are stamped. The body plate stamp is different from the car plate stamp.
All fill, and background on patent plates and TF car plates, are satin black. No clear coating. Painting was done before etching and stamping.
You can do your own comparison by looking at the various plates in the Unfinished galleries on both the TD and TF sites. There are plenty of close-up pictures of all the plate types.
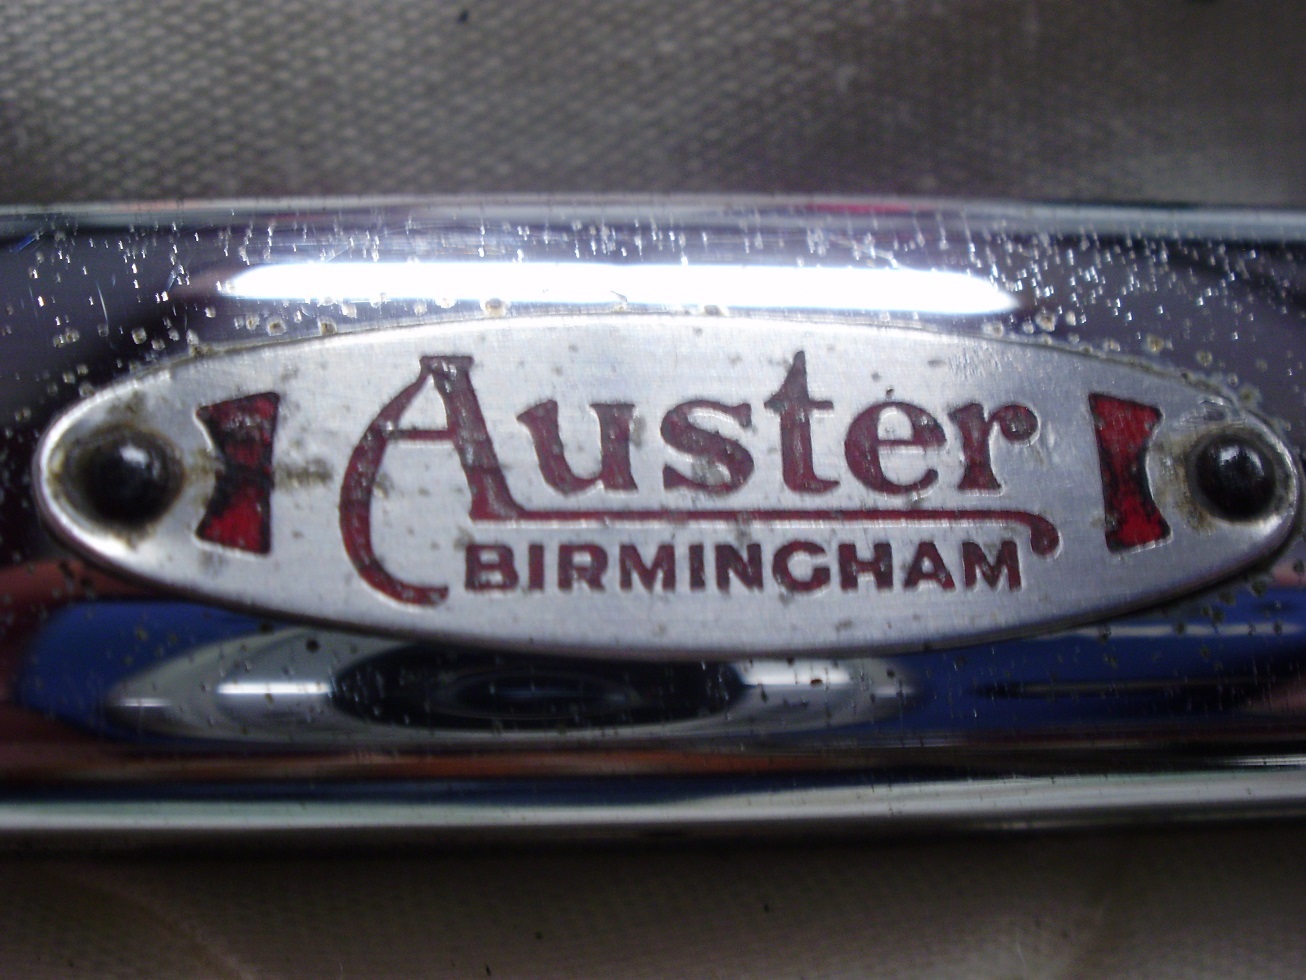
The Auster windscreen builders plate was attached to the bottom frame member of the windscreen via two tiny round headed rivets. Make sure that this plate is on the inside of the vehicle as many times you find it on the outside of restored cars. This plate is unusual in that it is done in two colors. Bright red for the Auster bracketed by black decorations to the sides.
This part is available from suppliers such as Moss Motors and Abingdon Spares but they did not etch the part. Instead they just silk screened the image onto a plate. If you want a more realistic copy then you will need to etch the image into the plate.
The original over the dash review view mirror that was used on the MGTD was supplied by Desmo. They included their logo on the back of the mirror (towards the front of the car) at the top. The metal parts of the mirror where plated chrome.

Found on early (1951 and earlier) cars with both painted and chrome headlamps.
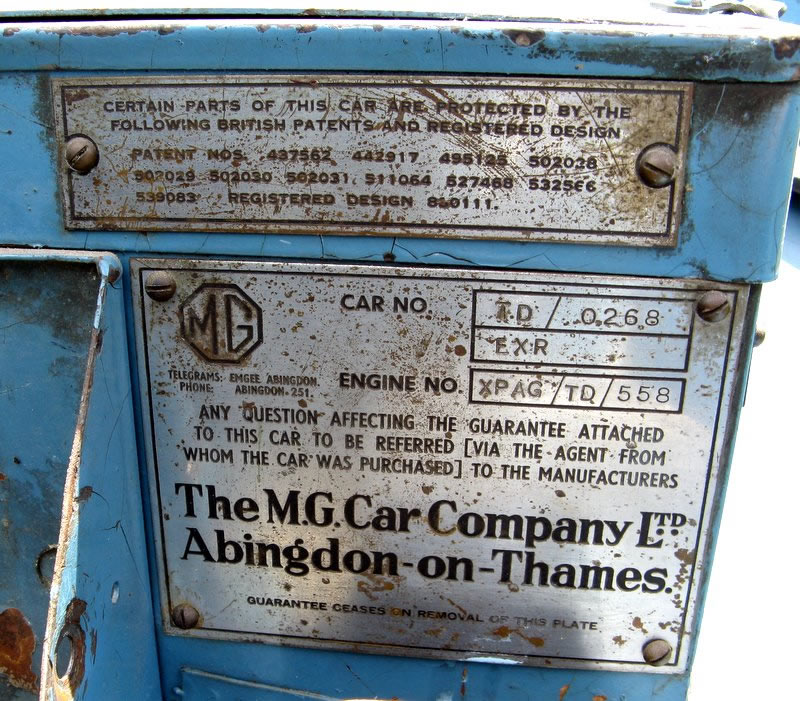
The chassis ID plate designates your car and engine numbers. There are many versions of this plate. Any early and later one as well as ones with etched common information and blank ones that could be used for any market or engine style. Reproductions of this plate only support the late blank or universal version. Some cars had plates with some of the common information etched such as market and engine type. You may need to add this etching to a reproduction plate if appropriate for your car. These plates were nickel and filled with black paint.
 |
 |
 |
 |
 |
 |
 |
 |
The TF Chassis ID plate is different from the TD plate. First off you will notice that it is overall black with the lettering in the plate background vs the TD plate has overall plate background with black lettering. Second the plate is not made of nickel plated brass but aluminium. And as noted above is a mixture of etched, engraved and stamped lettering vs just etched and stamped as the other plates are.
The body plate contained the body type and body number stamped into the surface. The plate itself was plated in nickel with filled letters in black. These can be obtained commercially.
This plate is on the left hand side of the firewall next to the toolbox. In North America, around mid 1953, this plate was moved to the underside of the toolbox lid. See the production information pages.
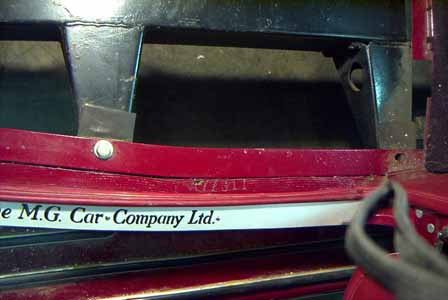
The body number was also stamped on the body frame just under the left hand floorboard.
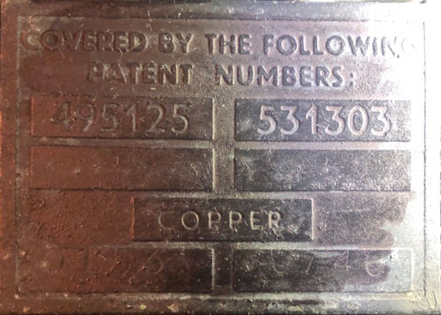
There are two versions of the patent number plate. Very early cars had an all nickel plate with black numbers and a black boarder. Newer plates for most of the production had a painted background (black) with raised patent numbers in nickel. Both plates were done in nickel. You can obtain these commercially. Use the MGTC plate for very early cars (see the production pages) and later cars the MGTD plates.
 This plate was attached to the right hand door's sidescreen at the top
cross member. It sported a black background with natural raised lettering.
This plate was attached to the right hand door's sidescreen at the top
cross member. It sported a black background with natural raised lettering.
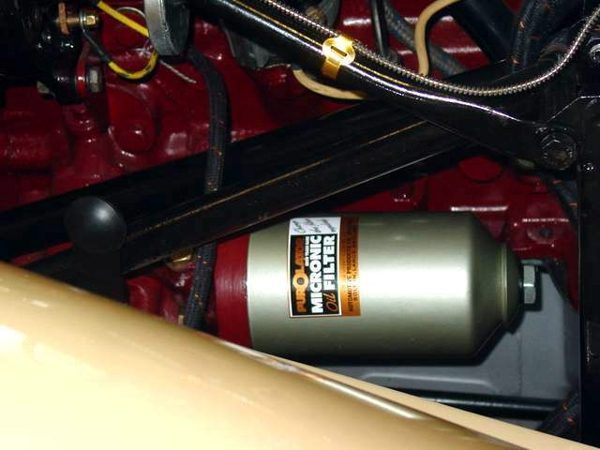
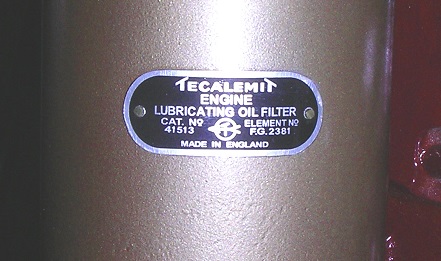
This plate was affixed to all Tecalemit filters (late TD's) and was photo etched. The background looks black but is actually a very deep blue.
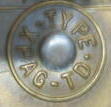
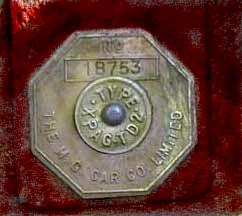
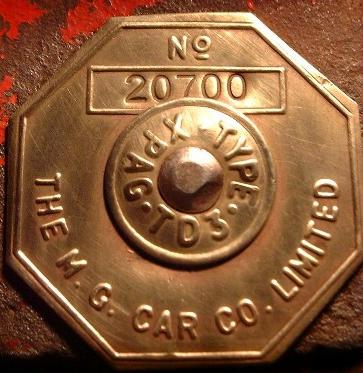
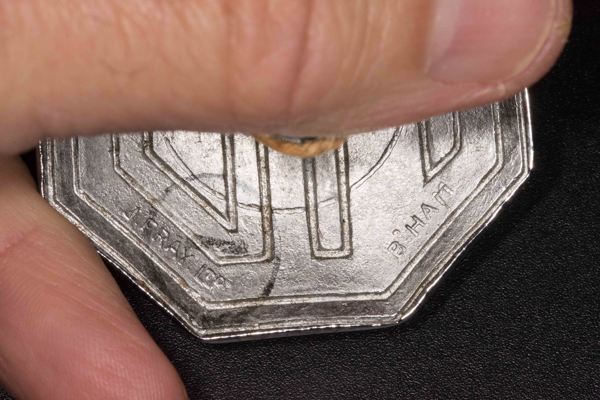
Octagonal plate with inner circle ring. Raised letters riveted to the engine block. Includes stamped engine number that is matched on the chassis ID plate. Note there were TD, TD2 and TD3 inner tags. These pictures also show the correct type of flat headed rivet to hold the tag in place onto the block.
Note: Before the factory started using properly-manufactured "TD2" tags they used up the supply of "TD" tags on TD2 engines, stamping the added numeral "2" with a punch - usually roughly and not at all centered.
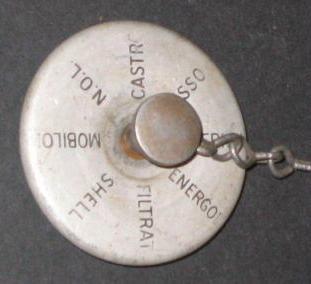
Etched around the oil cap filler were popular brands (recommended by the factory?) of oil. This part had a mat finish (could be cadmium or unpolished nickel) with etched and black painted letters. The knob appears to be finished in a soft nickel. The chain appears to be cad plated.
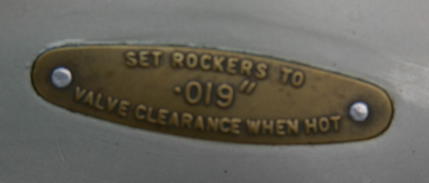
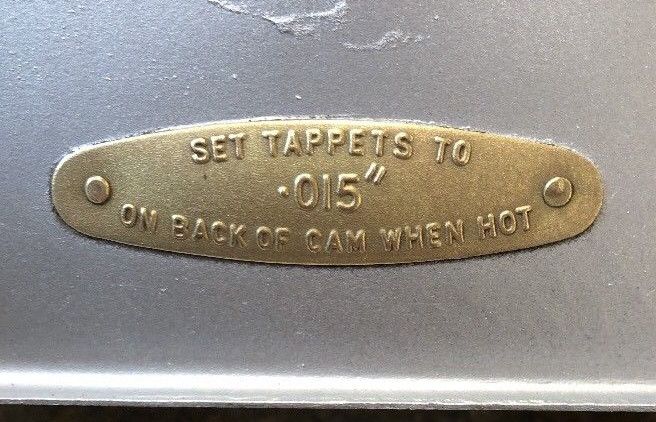
The tappet (rocker) setting clearance plate was affixed to the left side of the rocker cover and was unfinished brass. The plate came with either .019", .015" or .012" clearance depending on the engine. See the production pages for more information.
This one may have been stamped on but an etching may be a good facsimile just in case. Not painted to my knowledge but you could if you wanted more contrast. Most have this chrome plated.
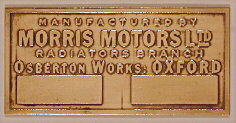
Found on the upper right corner of the radiator core on the engine side. Painted with the core but you could treat it in brass and paint for an enhanced effect.
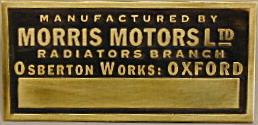
Found on the tank top generally on the right hand side. Painted black.
Each plate carried a stamped serial number.
Another plate found on the tank top. These plates were soldered to the tank and painted black overall.
Note: These plates may be available in limited quantities. Please contact Jim Threadgill for more information.
This plate was put on some export cars. It was found on the left end of the tool box just below the band that the clasp is attached to. The plate was made of brass and etched with the MG logo in front with the words MADE IN ENGLAND along side it to the right. Not all export cars seem to posses this plate. Certainly if you do not have two little holes on the left end of your toolbox you probably are not a candidate. Finished in nickel and black paint.
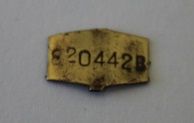
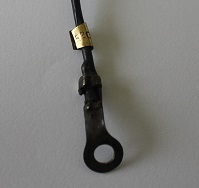
Each wiring harness received a special serial number tag from Lucas during manufacture. The numbers appear to be unique to each wiring harness. They are stamped on a small piece of brass and then folded and crimped onto the ground wire that is attached to the fuel pump. For the TD the tag is 5mm wide at the ends, 7mm at the centre, and 11mm long. The thickness is 1.4mm or 25 SWG The number height is 1.8mm or 1/16".
Tag information provided by Rod Brayshaw, New Zealand.
OK. These are not original for TD's (MG TA's?) but everybody has them. These were not plated but were natural aluminium that was polished and filled with black paint.
Frenchman Edouard Benedictus, through a freak accident in his lab where he dropped a beaker filled with cellulose nitrate, that did not shatter, invented the concept of shatter-resistant glass. Benedictus, in 1910, added a gelatin layer which stuck to both panes of glass and patented Triplex. The Triplex Glass Company was founded in 1923 and Triplex glass was brought to the U.S. in the twenties. Today's laminated glass consists of a thin layer of polyvinyl butyral (PVB) inserted between two layers of solid glass.
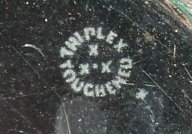
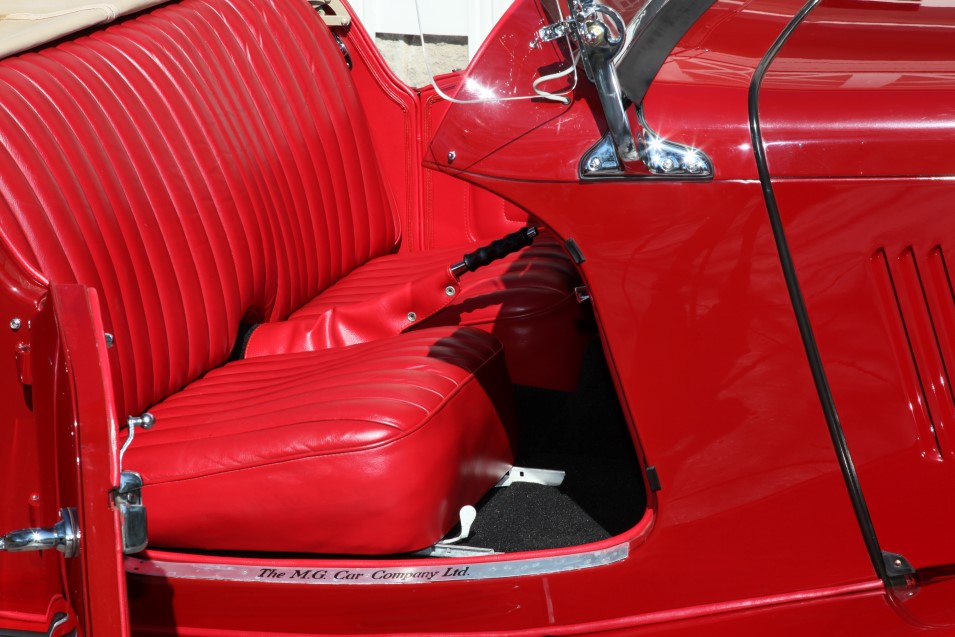
 The original on T-types is on the passenger side (either one depending on whether it was RH or LH drive) about 1-1/2 inch down and inside of the upper corner. Generally, the etching is on the inside facing out, but I have seen outside facing out and outside facing in (perhaps factory error or DPO error). All more modern MGs seem to have theirs inside facing out. The Toughened logo is predominantly non export as best as we can tell.
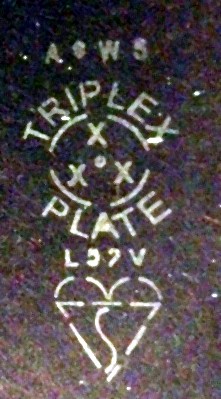
On the right is a plated, or laminated etching from an export 1953 MGTD in North America. We believe the 52 is the year of manufacture and the L stands for laminated. We are not absolutely certain what the V stands for (see below) but it appears to be for Vehicle. While its hard to discern it appears that there is a dot above the P in TRIPLEX which could indicate a 4th quarter manufacturing date that would go along with the 1952 year for a early 1953 MGTD. We believe the AWS stands for American Windshield Standard.
Regarding the date code: Each windscreen on the T-types had a logo etched along with dots above and below the logo itself, which indicate the quarter and year the glass was manufactured. Usually this is the same quarter the car was manufactured, but it could be the previous quarter. The instructions provided by Lew and the link below show how to place the dots so they correctly indicate the date of manufacture. It is a second step in the etching process but is quite easily done.
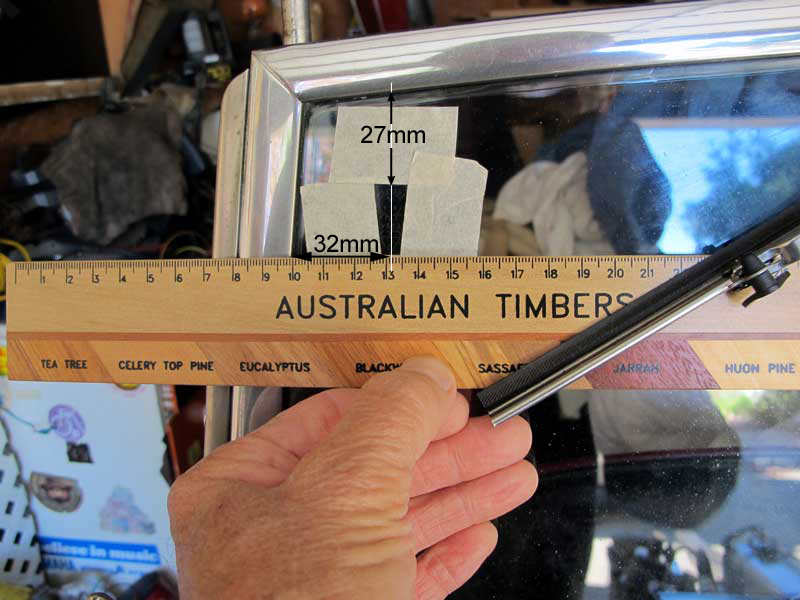
From Lonnie Cook who measured an etching on a late 1953 MGTF:
Note: These plates may be available in limited quantities. Please contact Lew Palmer for more information about obtaining either the pre-war simple Triplex etching or the more complex post-war (TD/TF) Triplex Plate etching.
 On TD/TF's, YT's and T-Types generally, the original Triplex windscreen logo is always on the passenger side and is located in the upper corner. This logo could be applied either on the inside or the outside of the screen and may face either in or out. On TD's original examples exist of all 4 possibilities, perhaps one reason being because the screens, like most TD components, came from a number of different suppliers.
Apart from some North American screens displaying the letters AWS above the logo, at least one LHD TD that I'm aware of, carrying an Australian Standards Institute logo, was exported from Abingdon into North America. If that was not just an isolated occurrence then English glass manufacturers could and would fit the one screen for either country. If so, it would explain why some logos are read from inside & others from the outside. Because the logo is always fitted to the passenger top corner, (which of course changes sides on LHD and RHD vehicles), this would effectively reverse the image. All more modern M.G.s seem to have theirs on the inside facing out. Examination of two period correct photos of original North American LHD TD windscreens in my possession shows that one of the photographs carries the letters ASI and the other, AWS. It is almost certain that ASI refers to Australian Standards Institute and that AWS may stand for American Windscreen (or Windshield) Standard.
The Toughened windscreen was predominantly non export, as England was slow to adopt laminated screens for the home market. Regulations in the US changed in 1937 when safety (laminated) glass was mandated for windscreens in all models. The Australian and New Zealand Standard Safety Glass for Land Vehicles AS/NZS 2080:1995/2006 defines laminated safety glass as "a glass consisting of 2 or more sheets of glass held together by one or more layers of plastic material known as interlayers".
 The Triplex image was probably originally media blasted but may also have been acid etched. Apart from my research, information provided in an article by Doug Pelton from From the Frame Up (with contributions from TC aficionado Bob Watts, an active member of T-ABC), has been used to decode the symbols. Their research documents the Triplex story and is well worth reading. All vehicles exported to Australia, New Zealand and markets further afield, (including some vehicles destined for North America as indicated above), carried the ASI Triplex logo. The word Triplex, the broken circle and the 3 X's are explained in detail in Doug's article. The word plate simply refers to plate glass. The L means laminated and the V stands for vehicle. This was confirmed by a retired Australian Standards Institute (ASI) employee. The heart or kite at the bottom is made up of the letters VSB, which stands for British Vehicular Safety.
On TD's the number from 49 to 53 refers to the year of windscreen manufacture. A more precise date of screen manufacture can easily be determined by the position of the dot above the word TRIPLEX. If placed above the T, it indicates it was made in the first quarter, above the R it means the second, above the letter I in the third and above the P it shows that the screen was made in the last quarter. In both of the illustrations in my possession, the glass was made in 1952, evidenced by the number 52. In the illustration with the feint ASI at the top the dot is above the P indicating it was made in the fourth quarter of that year. It is not at all unusual to have an original screen manufactured in 1951 fitted to a car that was built in early 1952. The glass obviously precedes the build date of the car and is almost always from the previous quarter.
It is a Roads and Maritime Services requirement in NSW that all windscreens carry the ASI compliant logo. I was unable to source a screen manufacturer here able to supply a replacement screen for my TD with an accurate Triplex logo. As originality is important to me, I had attempted to have the range of 16 reversible TD stencils made here in Australia in stainless steel. They were designed to cover the entire period of TD manufacture from the 4th quarter of 1949 to the 3rd quarter of 1953. The brief was for them to be able to be either acid etched or media blasted. However the stencils from the Qld manufacturer Mastercut were unusable as the font was too small to permit either the acid or the media to reach the glass. I’m presently looking into using another medium from a stencil supplier here in Sydney.
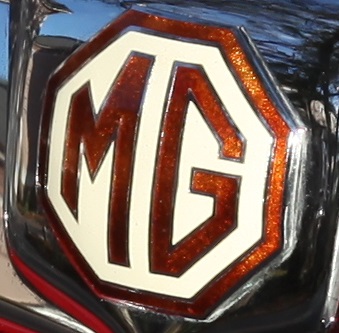
The radiator medallions where made of a cast metal, plated and then filled in with an enamel. The base MGTD used a brown and cream version while MK II TD's and TF's used black and white. These medallions are almost impossible to repair by a layman and you can either buy new ones of have your originals restored. Maxwell Enamels does an excellent job of restoring enamel badges and emblems.


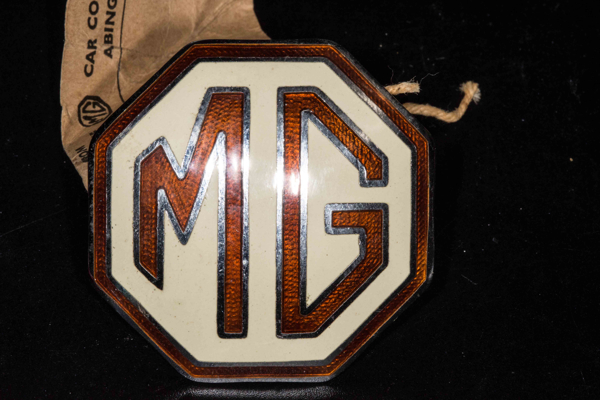
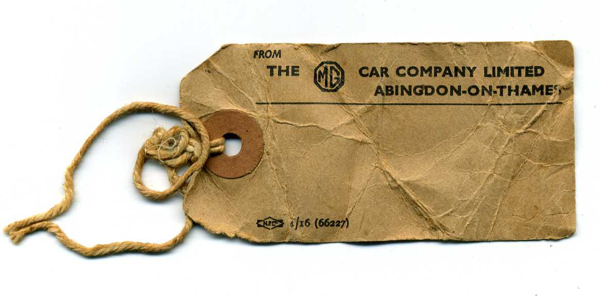
NOS images provided by George Butz III, Florida, USA
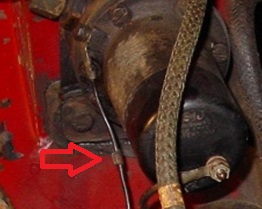
This paper warning label was attached to some unrestored cars (see Gallery pages) voltage regulators that had very low miles. These were North America cars and it is uncertain if this was left in place at the factory or came with a replacement voltage regulator. It is made out of heavy paper or card stock that has a yellowish or cream color. There are two holes that the cap loop is fed through.

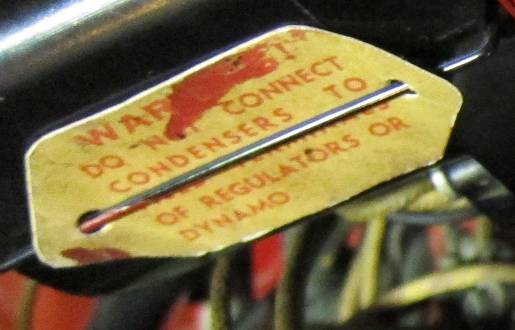
Using the following image you can create your own Dynamo warning card if you have a color printer. Here are the steps:

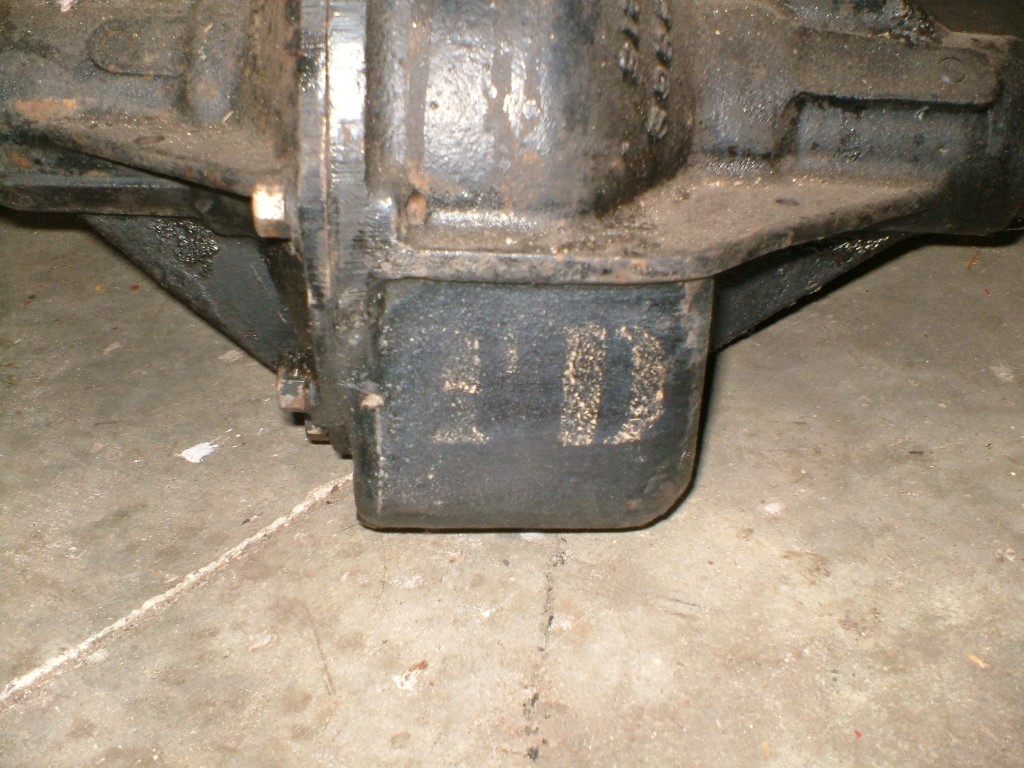
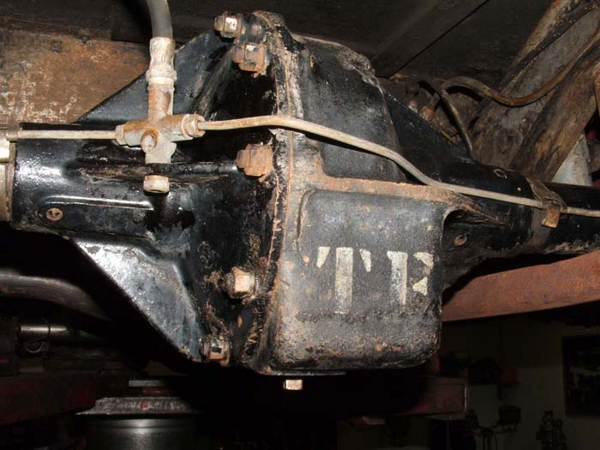
On some TD's and TF's there was a stencil on the rear differential (seen from the back of the car) that indicated TD or TF. Most believe that this stencil was done in white but a few thought the cars was done in yellow. There is no documentation anywhere on the purpose of the stencil and it does not appear on all unrestored cars. In fact most cars that have been restored by owners did not notice any sign of a stencil during restoration. However a number of cars do have the stencil so it is up to you if you would like to include it on your car. The speculation as to the origin of the stencil is that when the factory recevied various lots of rear end assemblies that one of the rear differentials in the stack was marked for the type of car it was intened to be placed on. Therefore not all rear ends would have needed to be stenciled, just one in the lot.
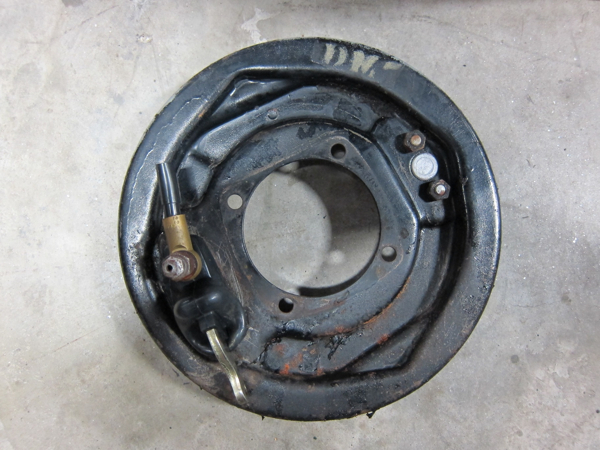
One MGTF was identified as having a stencil on the backing plate of the rear axle. The stencil was marked DM7 to indicate Ferrodo DM7 style brake liners were installed.
To restore or create a reproduction you have to go through a few steps. First you must obtain an image of the original. This page should help you in that regard. Secondly you will need to create a mask and then etch the item. After this process you may need to have the item plated depending on its original finish. And finally you will have to fill in the etching with paint to make it stand out (or conversely fill in the background). A few etchings were really a photo chemical coloration and are not really painted on (ex: Tecalemit oil filter plate). This article does not cover that process.
Etching is the process of removing a specified amount of material from an object by using acid or some sort of abrasive. Etching is generally done via some sort of mask either directly with an acid or using the mask to photochemically treat the material first. In the case of the MGTD many of the etchings were done over brass but other metals were used also. A very popular use of etching is in the creation of printed circuit boards. In fact you may find that process most useful to you. You can find a brief overview of the etching process at this site.
Warning: Anyone considering doing their own etching should realize that it is a fairly difficult and dangerous process and your results will not be guaranteed. I would suggest that you consider sending your part and mask template (image) to a professional when etching is required. If you do decide to try your own hand at etching you should experiment on like materials as the part you will be ultimately using. Also I do not recommend trying to deepen or re-etch existing parts, at least not by a layman.
To restore etched parts requires a few basic steps. First you must thoroughly clean all of the parts to be treated. This includes removing any existing paint and/or plating. Plating will generally have to be removed at a plating shop.
You will need some sort of mask that will indicate where the etching should/should not take place. One these pages I will attempt to provide you with images that you can use to generate your own etching masks from your computer printer. Generally the best way to mask your part is to create the mask with your computer. If you have a laser printer you can generate your mask directly otherwise you will have to first print your mask and then transfer the image to the mask material with a Xerographic copy machine. You can find photo generated mask material and instructions to make the mask here.
Once the parts have been stripped and cleaned you can begin the etching process. Follow the instructions with your etching materials and mask. Be sure to take all the environmental and personal protection precautions because acid is very dangerous to you and the environment. See cautions above.
Most of the ID plates on the MGTD were nickel plated. Nickel differs from chrome plating in that chrome plating is usually done in three layers. The first being a layer of brass which provides a smooth uniform surface that can also be lightly polished if needed between the first and second platting. The next layer is nickel which gives it the silver look. Nickel has sort of a yellowish tinge to it. Nickel can oxidize like any silver and can turn dark yellow and even gray or black. It needs to be polished frequently to retain its shine. Finally in chrome plating the third layer is actually the chromium. This is applied in a very thin, almost transparent layer. Its' main function is to protect the nickel from abrasion and tarnishing. It also gives chrome plating that characteristic bluish look.
To properly plate your etched parts just have them nickel plated, straight over the existing brass. Be careful that you do not have the plate overly polished first otherwise you may remove some of the etching and/or your plate will look to shiny and be confused with chrome plating, at least until it starts to tarnish.
Most of the etched parts were painted after the plating process. Some may have been silk screened or photo etched as reported above. For those plates that were painted here is how you can replace the paint.
First it is important to realize that in some cases the paint provided a contrast for the letters and was actually used as a filler. In other cases the paint actually provided a dark background for the letters to rise above the background and stand out. In either case the principal is the same. You will need to put paint in the recessed or etched areas and leave the non etched areas to rise above for contrast.
Start by making sure your plated etching is free from all grease and oil. Use a good grade of commercial painting pre cleaner or alcohol to clean the surface. Next obtain the correct color of paint, black in most cases, in a lacquer base. Lacquer based paints work best because they are easier to work with after the paint has cured. Do not use a primer! You will need to spray the entire area of the plate. A good tool for this would be an artist or hobby airbrush. Build up a good deal of paint because the next process will remove most of it.
You will have to experiment a little from this point but the good news is that you can do this over and over again without hurting anything or seriously having to redo much work. The object at this point is to remove all the paint on the surface of the etching while still retaining the paint within the recesses. This will be easy to do on those plates where the etchings make up the text and figures. On the plates where the paint constitutes the body or background, this may be a little tougher.
There are many techniques to remove the unwanted paint from your etchings. Each has its own benefits and detriments. You might find one useful for one type of plate but totally inappropriate for another. Try them as you see fit.
The easiest way to remove paint is through the use of a solvent. If you have used a lacquer type of paint then lacquer thinner is what you will use. Other types of paints may need another type of solvent. Use the solvent sparingly and remove as much of the paint on the larger areas as you can. For tools I like to use smooth cotton such as bed sheets wrapped in a mandrel or rod. I soak the cloth and then wrap it tightly around the rod. Then I carefully wipe this across the surface, removing a little paint each time. After each pass I would recommend you use a new piece of cloth or an unused portion of your cloth. Stop just sort of removing all the paint when you can see the raised portion coming through. At this point you will follow up with the polishing technique described below.
You can also use cotton swabs to carefully remove paint in stubborn areas. If you make a mistake and remove too much paint let the part dry for a while and then recoat again. You can concentrate your touch-up in those difficult areas and work it until you get the look you want.
This technique is much slower than the solvent method but is less deliberate in the removal of the paint. Start with a hard surface such as a 12 inch square plate of glass or metal. It must be perfectly flat and smooth. Cover it with a piece of smooth cotton. You can experiment with bed sheets or cotton T-shirts. Make sure there are no wrinkles or creases.
Using a fine hand polishing compound invert the plated piece and rub it over the hard surface covered with cloth. You will need to inspect the part many times during the operation to make sure you are only removing the paint that you need to. Press down firmly but evenly while rubbing. You may need to replace the cloth and/or add compound frequently as needed.
When you get to a point that you can just see the image coming through you should switch to a car cleaner wax or a lighter compound. You may also use finer tools such as cotton swabs or your finger covered in cloth to work smaller areas. Once you have removed all the unwanted paint then buff with a clean cloth. You may optionally coat your parts with a clear coating to keep the nickel from tarnishing and to protect your painted areas from wear but I generally do not find this to be required.
Note: The other day someone showed me an even better way to remove the access paint. Once you load it up and it is still wet, drag a fresh business card (or other thin cardboard card) to pull the excess paint away. You may have to repeat this a few times to fill it adequately. Then let it dry overnight and use a flat surface and a rag with thinner or polish to remove the thin layer or film of paint leftover. Then polish with car wax or a light abrasive car cleaner wax to remove the last traces of paint from the high surfaces.
Home | History | Details | Myths, Tips and FAQs | Literature | Entertainment | Gallery | Links | Map
| © 1999 - 2024 by Christopher C. Couper | Page last modified: 2023/11/26 |