|
|
|
|
|
|
|
|
|
|
|
|
|
|
|
|
|
End of Menu Items |


Y 6089 – a convertible Y 
For some time after the accident (and glad to be alive!) I was not sure what to do: either to scrap the car, or rebuild as a "special". Having decided on a rebuild as a tourer my aim was to produce a practical car which looked good.
The damage to the body shell was considerable (see below). The sunshine opening roof was out of square, and even the right hand front windscreen pillar had been bent forwards. However, the insurance inspector stated that "the chassis was undamaged".
Sandy's full story is contained below, but here is a short Design and Construction summary.
Design and Construction
To give the car some style, a strong horizontal line was required. I dislike the factory 'YT' as the cut-away doors, which looks good on the two seater 'T' Type, makes the 'YT' look stubby. So straight through doors and a low 'window line' were decided upon. I like two-door cars, so designed two wider doors, which, in turn meant new door pillars etc.
The construction using a metal / timber frame is as straight forward as possible as the whole body was built using hand tools and a basic welding set. The only special material were various steel sections folded to my own design by a local sheet metal firm. The finished frame was panelled in aluminium, insulated from the steel to avoid any reactions between the two metals. A hood frame, hood, side screens, and tonneau cover were also designed and produced.
When first back on the road, the car oversteered strongly. Following a discussion with a suspension specialist, who pointed out the possible weight reduction, I decided to remove the two shorter leaves from each rear spring. This reduced the oversteer to 'normal'.
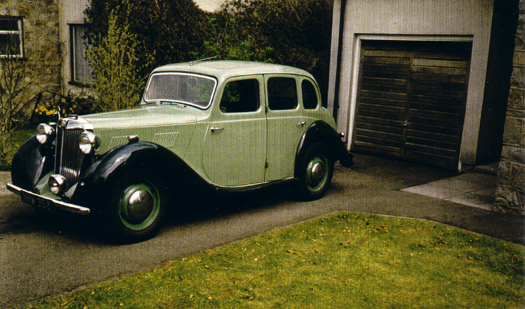 Y 6089, before ... |
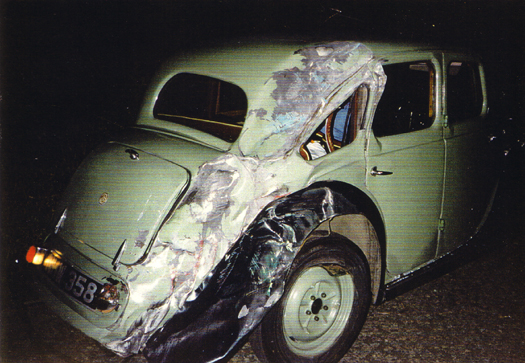 ... and after the accident |
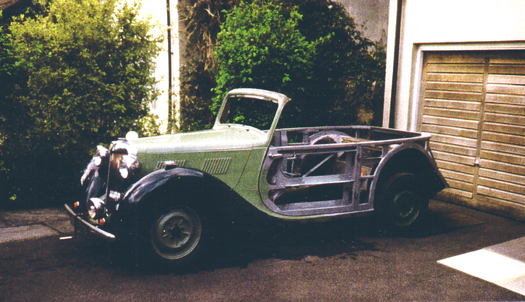 The new shell takes its shape. |
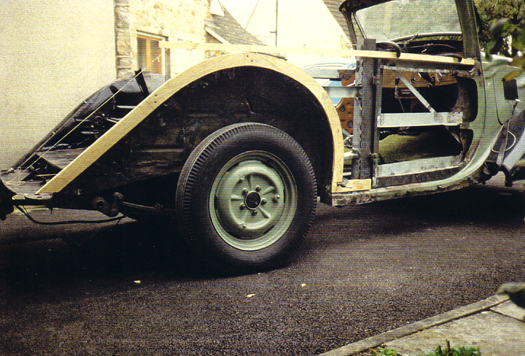 A close–up of the rear wing form |
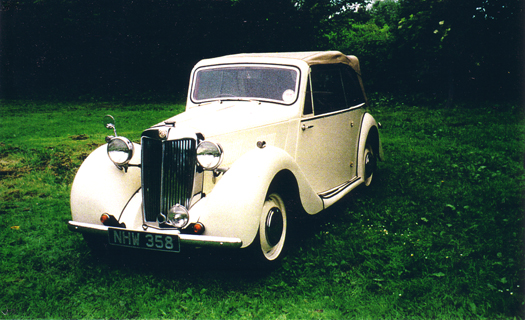
 The finished product |
 ... and up. |
 And again, from a different angle. | ||
After almost 12 years (1998 – 2003) of use the body is still sound. The car is more spirited and stops better – it must be about 1cwt lighter. The project is a success! The car was featured in the Sacred Octagon magazine in August 1992.
A 'Y' Story.
By Sandy Henderson.
It was after midnight, a beautiful July night in 1991 with a full moon illuminating a few scattered clouds. The old Y Type was returning from a weeks motoring in Northumberland. We had been travelling south all day mainly on 'A' roads, but since Gloucester feeling there would be little traffic late at night, on the motorway.
Numerous cars had passed us towing caravans also going south, but now we were heading east for a short stretch on the M4, in another mile or so we would turn south again on to the M32 for Bristol and home. Since joining the M4 there had been no traffic going east but now, at least a mile behind us, headlights appeared. The overtaking vehicle was now very close, its headlights flooding the interior of the car with light. Then all of a sudden all hell broke loose. There was what sounded like an explosion, glass fragments, sparkling like diamonds in the bright light flew about. My seat back collapsed, the front of the car reared up and swung to the left. I was driving up a steep hill, trees and bushes flashed by, then the cars headlamps shone into space, quick–right hand down. Now down hill, more trees and bushes, then back on the road, turn left, pull in and stop. Fifty yards ahead a large lorry is parked... .
All this happened in about 20 seconds. The 35 tonne articulated truck had run over the right hand corner of the car, as it did so the car pivoted on the right hand rear wheel. My wife and I were very lucky, we did not have a scratch, but were of course, very shaken. The strength of the Y Types steel bodywork had taken the full force of the impact causing the car to be hit, like a billiard ball, up the motorway embankment. We were also very lucky in that the incident occurred in a cutting so that we were able to return to the road. Had we been hit down an embankment, or even worse, into a bridge abutment, heavens knows what would have happened. I think a T Type would have just been run over and even a modern car, designed to deform to reduce the force of an impact, may have been crushed under the wheels of the lorry. The police were called and we returned home, both the Y and us by recovery vehicle.
For years I had run modern cars but had caught the 'old car bug' again when my daughter, who had just passed her driving test, saw an advert for an old Y Type MG. Considering the state the car was in we did not buy a bargain; in fact we ended up buying her a Morris 1000, leaving me to rebuild the Y which looked good but was really in a poor state. The most serious fault being extensive corrosion where the chassis passed below the rear axle.
My first rebuild had been about 35 years before, when the family Morris Eight had needed a major repair due to the corrosion of the rear body and wheel arches. It made a very useful estate car. I had grown up with the old Morris, in fact it was the same age as me, and whilst a school boy I had often helped my father, a marine engineer, with running repairs. That was a few years before the dreaded rust had taken hold. With the Y Type the bodywork was reasonable, there was just the chassis to weld plus a few odds and ends.
More expenditure was out of the question so some DIY was called for, the only snag I was not a welder. A friend whom I had met in the course of my work was very supportive. He ran a sheet metal company and gave me some off–cuts to practice on. I had bought a cheap welding set which was, I am afraid, a complete waste of money. Basic equipment from BOC was a great improvement and after reading several books, plus plenty of practice and advice, I could weld. In addition to repairing the chassis members I carved out some new rear–spring hangers from some 10swg steel channel and welded them in place. The right hand one withstood the weight of the lorry in the accident without damage. The saloon rebuild became a family project. My son helped with the metalwork and mechanics while my wife and daughter tackled the seats and a major job, the headlining. I would not like to estimate how many hours we all spent.
Following the accident an insurance assessor came to view the car and stated that it was a complete write–off. The bodywork being distorted beyond economical repair, but because the major damage had occurred at waist level and above, the chassis was undamaged.
The insurance company paid the agreed price and I brought the car back for a nominal sum. Several weeks were spent with the family debating as to what to do, scrap or rebuild the car as a tourer. My first idea, to construct an estate car was turned down flat, so, wind in the hair motoring it was to be.
There is of course, a factory built Y Type tourer (the YT) and with some difficulty I could have attempted to construct a similar body, but after looking at some photographs and taking note of the number of compound curves, I knew that such a body would be impossible for me to produce. In any case I did not like the combination of cut–away doors and short bonnet which, to me, results in a fussy design with no strong horizontal line. 'Keep it simple' I said to myself. The idea was to retain the wings and front section of the car, including the scuttle, bonnet and radiator etc., as these items with the exception of the right–hand rear wing, were undamaged. I would design a body with single curvature panels which had to be as neat as possible and which would compliment the attractive MG front end. The aim was to produce a complete car that would appear to be a professional job. The design had to be simple as you can 'draw' anything, but making what you draw can be something else.
An outline sketch was produced and a general arrangement decided upon; a five panel body. This would be two door panels, two side panels to the rear of the doors which turned around each rear quarter, and a flat fixed rear–centre panel. This layout meant that there were only two panel joints (with the exception of the door shut lines). There would be no attempt to hide these joints, in fact they were to be accentuated by two stainless–steel cover strips, one each side of the spare wheel, giving the car a similar appearance to a 1930s Morris Eight Tourer.
The design would require the construction of new doors, door pillars, and of course a complete new frame to support the panels to the rear of the doors. I decided to retain the front section of the saloon doors below the waist–line, and realised that due to the position of the lock at the top front corner, there would be nothing to hold the lower front edges of the doors against the body when shut. The lock of a T type is almost halfway down the door, keeping both front corners tight against the body when shut. I could only move the lock positions with difficulty. The solution was to make and fit quarter–light frames, which would form supports for the front edges of the side– screens and in effect, move the locks mid–way down the doors. The existing saloon windscreen surround would be kept, the top rail reinforced by a new section taking the hood header rail and also forming a rain water gutter. Retaining the surround would also eliminate scuttle–shake. (Note:– the TD suffered from this badly at first, and had to have a steel hoop fitted to support the scuttle.) To ensure that the rear of the car would be well braced no boot opening would be provided, the spare wheel being mounted on the outside of the centre rear panel by a simple bracket. In addition a steel brace would be made to connect the rear–inner wheel arches and form a support for the rear seat back. Weather equipment would consist of a fabric hood supported by three folding tubular hoops and four side–screens. The top edges of the doors and body panels to be capped with varnished hardwood. That was the plan, it only remained to build it.
The equipment at my disposal was fairly basic. I had the usual sets of spanners and metal working hand tools, a range of woodworking tools, and electric drill, a jigsaw, an angle grinder and a gas welding set. I had a bench fitted with a large vice and a couple of one inch square metal bars, which could be used with the vice as folding bars to form sheet metal. These were very useful to make up brackets to reinforce the timber frame. My single garage, integral with the house was dry but drafty, it was small but just about large enough for the job.
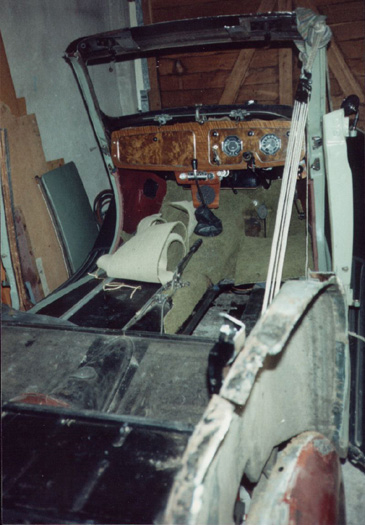 The remains of the saloon bodywork were carefully examined to decide exactly what to keep and what to scrap, where to make the cuts, etc. First the doors, boot lid, opening roof panel, the wings, running boards, seats, steering wheel, and roof lining were removed. A couple of days work with a hacksaw and angle grinder soon had the body cut up into reasonable sized pieces which were taken to the local re–cycling facility. The inner right–hand rear wheel arch was a problem as it had been crumpled up as though it were a piece of waste paper. A number of vertical cuts were made about six inches apart, then the deformed sections were unfolded and beaten into their original shape, before being welded together. The right–hand windscreen pillar had been bent forward an inch or so. A block and tackle (normally used to take the engine out) was rigged between the top corner of the windscreen surround and the chassis to pull the pillar back into its correct position, refitting the windscreen to ensure a correct fit. A second–hand right rear wing was obtained to replace the one destroyed in the crash.
At about this time I read in the Octagon Club Bulletin that there was to be a tour of England by members of the New England (USA) MG 'T' Register with their cars, and that they would be visiting Bath, only about fifteen miles from my home. I went along to meet them and had a conversation with George Werbizky of New York. In addition to his T Type he owned a Y Type Tourer and we had an interesting chat. 'Be sure to send me some photos when you complete your rebuild,' he said. I promised I would.
The first items to be constructed were the door pillars made from two right–angled sections of steel plate, welded up to form a tapered box–section. They were positioned approximately eight inches further back that the original 'B' posts, and were welded to the sills. No part of the new construction was welded to the chassis so that, when complete, the new body could be removed from the chassis if required. The pillars were braced by brackets welded to the front corners of the rear seat–pan. In addition a steel channel section was welded between each pillar and the rear wheel arches. The saloon door hinge mountings were fixed to the new pillars at about fifteen inch centres. The door frames were constructed next incorporating the front sections of the original doors including the locks.
The above descriptions may make the new construction sound a straight forward process, but before any work was carried out many sketches were made, detailing how the various parts were to be put together. Perhaps there are six or eight different ways to make and brace a door pillar, so I would discard sketch after sketch, then work up and detail the best idea. There were no working drawings as such since most of the design process was in my head. I kept making small errors and would clamp parts together or maybe fix things with pop–rivets or self–tapping screws before doing any welding. Invariably I would have to make adjustments or sometimes, 'go back to square one.'
Anyway, let us go back to building a door. The frame of the door was made up of vertical 'Z' section on the rear or hinge end. One arm of the Z formed a short overlap on the outside facing to the rear so that rain water would not enter the car when going forward. Then there were three horizontal right–angle sections, all in steel, connecting the rear Z sections to the front section (part of the original saloon door) and finally a diagonal brace.
 The next stage was to construct the framework to the rear of the doors. A template was made of the wheel–arch shape and a pair of timber frames made, and fixed to the outside edges of the wheel–arch by screws fixed through a series of metal lugs welded to the wheel–arches. A top body rail was made of timber in three sections to run at waist height from the tops of the pillars around the rear of the car. The rail and tops of the doors aligned with the bonnet hinge–line and were about two inches below the saloon window line. The top rail was fixed to the tops of the door pillars and was connected to a timber rail fixed across the extreme end of the boot floor by two angled timbers, positioned to support the joints between the rear centre panel and the side panels. Steel brackets were used to reinforce the various timber joints.
Prior to fitting the panelling the frame was faired up using a straight edge. As all the panels were of a single curvature this was not difficult. The lower timber sections were treated with a preservative before the complete frame was painted. Aluminium sheet was used for the panelling and was fixed to the timber with brass pins. The pins were positioned so that their heads would be covered by stainless–steel trim which was fitted later. In the case of the doors, which were steel framed, the aluminium skin was beaten around the frame edges. The aluminium/steel interfaces being insulated with double–sided carpet tape. Paper patterns were made of the rear quarter panels and the aluminium cut oversize. Fitting these panels required some care as they went from the door pillars around each rear quarter and included an angled 90 degree turn. A sheet steel quarter rounded former was made and was placed from top bottom of the frame, it was then easy to hand–form the aluminium around each rear quarter of the car. The former was then discarded.
The next stage was to hang the doors using the original hinges and fittings from the saloon. After numerous re–settings of the hinges a satisfactory fit was obtained. The final panel at the rear of the car which was to carry the spare wheel, was reinforced with a half–inch plywood sheet fitted flush with the frame, before being covered with aluminium. A mounting bracket for the spare wheel was made up from sheet–steel and bolted to the centre of the panel. The top edges of the body were fitted with aluminium capping topped with mahogany trim. Where the side–screens rested on the capping a 'water–stop' was incorporated.
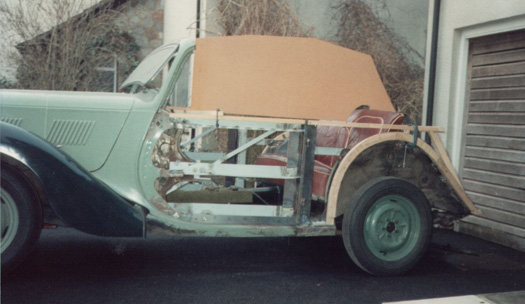 The hood presented the next problem; what sort of shape should it be? My wife, Pam, suggested that if she sat on the rear seat we should get a good idea of how high to make it. So Pam sat in the back whilst I drew a profile of the proposed hood on a piece of hardboard held temporarily in place. This was cut out and when supported in position, gave a good idea of the appearance of the car with the hood up. It also helped me to decide the positions of the supporting frame members. Hinge points for the frame were fitted below the top rail to the rear of the doors. A slot was cut in the top rail to accommodate the frame which was to be within the edges of the bodywork when folded. The hood itself was to be removed and stored in the boot. The frame was made from two main tubular hoops plus a third hoop bracketed from the front main hoop.
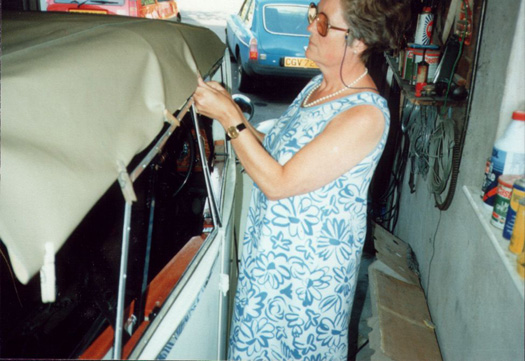 The side–screen frames were made from welded flat steel bar, each frame fitted with two mounting brackets fixed by hand–wheel / bolts threaded into captive nuts fixed behind the inner lining of the doors and rear side panels. Clear vinyl glazing was fitted to the frames, fixed from the outside by aluminium strips held by counter–sunk stainless steel screws. Pam took charge of making the hood and now that the frame and side–screens were complete she was able to measure
the exact size. It took several days to sort out the overlaps and seams etc., but with the help of our old Singer sewing machine plus me holding the excess material (it was quite a large hood) the job was completed. The hood was fitted with a front header rail fixed to the windscreen surround by two hand–wheel / bolts and at the rear by 'lift–the–dot' fasteners. Pam also made a two–part tonneau cover, the front of the rear half being supported by a removable rail when the rear seat was not in use.
The side–screen frames were made from welded flat steel bar, each frame fitted with two mounting brackets fixed by hand–wheel / bolts threaded into captive nuts fixed behind the inner lining of the doors and rear side panels. Clear vinyl glazing was fitted to the frames, fixed from the outside by aluminium strips held by counter–sunk stainless steel screws. Pam took charge of making the hood and now that the frame and side–screens were complete she was able to measure
the exact size. It took several days to sort out the overlaps and seams etc., but with the help of our old Singer sewing machine plus me holding the excess material (it was quite a large hood) the job was completed. The hood was fitted with a front header rail fixed to the windscreen surround by two hand–wheel / bolts and at the rear by 'lift–the–dot' fasteners. Pam also made a two–part tonneau cover, the front of the rear half being supported by a removable rail when the rear seat was not in use.
The interior of the doors and side panels were lined with hardboard covered with padded vinyl which was a near colour match to the red leather seats. The original front door pockets were incorporated in the new door linings. The backrest of the left–hand front seat was made to fold, which together with the wide door made access to the rear seats easy.
Before remounting the wings the car had to be painted. Old English White was to be the colour as we felt it would be easily seen. A reasonably priced air–compressor was purchased, together with spraying accessories. After some trials on scrap material I could manage a serviceable finish and gave the car a total of six coats of cellulose over etch–primer. The car was soon completed and road tested. As promised, I sent a few photographs of the complete car to George Werbizky, my American friend. About six weeks later I received from George a copy of 'The Sacred Octagon' magazine (the New England MG 'T' Type Register journal – see Reprinted Articles). He had sent my photos together with a covering note to the magazine and my rebuild had a whole page to itself, giving me quite a boost.
The construction of the new bodywork took a total of three years. A lot of time was spent in working out how to overcome the various problems and stages, a pencil and sketch pad being almost constant companions. There was a problem which had not been foreseen, when rebuilding the car the first time (as a saloon) the rear springs had been reset. The new tourer body was much lighter and hardly settled the rear springs at all, so that the car was always going 'down hill'. Following advice from the firm who had reset the springs, two of the shorter leaves were removed (now five instead of seven). Not only did this overcome the tail–high attitude, it also improved the handling. The reduced weight also improved the performance, though only slightly. The brakes too feel more powerful, no doubt due to the reduced weight.
 The car has given excellent service, it has been a tourer for fourteen years, and is always a pleasure to drive. The car like most old MGs, gives pleasure to complete strangers, the more knowledgeable ask, "What kind of MG is that?"
Was it all worth it? Of course it was, another old MG saved from the scrap–heap. The other day I drove past a group of teenagers in my village and as I passed, one of them called out, "Nice car".