|
|
|
|
|
|
|
|
|
|
|
|
|
|
|
|
|
End of Menu Items |


Jackall pump overhaul — a record of my experience
By Saul Duck
I am going to try and not to repeat any of the other stuff that's already been written about the Jackall system and I am not going to give any history of its use in MGs or specifically Y-types (see the fine Register Information Sheet 7 on the Jackall system). All I am attempting to do, is passing on the experience I gained while refurbishing the Jackall system on my YT in the hope that others might find it useful.
The first thing I want to get out of the way is the question of what oil to use. In my experience it's fine to use pretty much any mineral oil. I have run mine using hydraulic oil for trolley jacks (from Halfords) and motorcycle fork oil (which is the usual recommendation) and there has been absolutely no difference in operation between the two. As long as you do not use any veggie-based stuff like brake or clutch fluid then in my opinion you'll be fine using whatever oil you feel like. It really doesn't matter. There is obviously a strong argument for using whatever is the cheapest option, particularly while you are working on the Jackall system as there's a chance quite a bit of it might well end up on the garage floor.
When I purchased my YT the Jackall reservoir was empty and there was no handle for the pump. Encouraged by reports from other Y-owners that they had just filled up their systems with hydraulic oil to find them working perfectly first time, I figured that I might as well just try it. So I bought a handle from NTG and some oil from Halfords and set to work. I was disappointed to find that the rear jacks did not move at all and that though the front jacks extended they never did more than lift the car up onto its toes.
As fixing the Jackall system was relatively low on my list of priorities I thought I would return to it at a later date and just left it with the oil in the reservoir as there did not seem to be any obvious leaks. Unfortunately, over the next few days the majority of the oil seeped up around the pin of the pump's main release valve and dumped itself onto the garage floor. This led me to deduce that there was a dodgy seal in the pump, so I drained the oil, purchased a set of pump seals from the Y-register and forgot about it for three years.
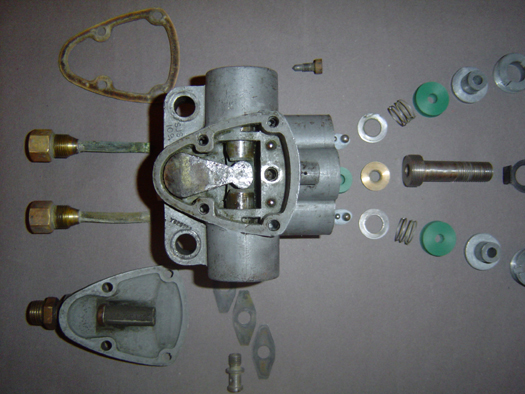
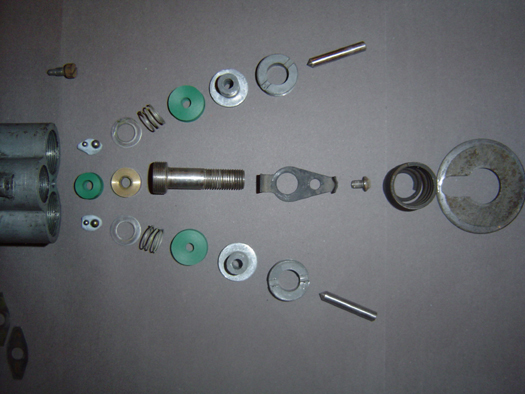
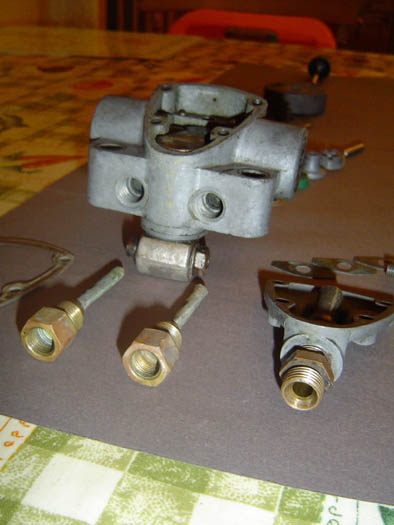
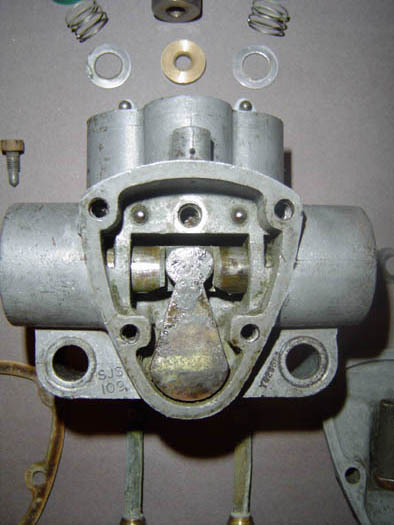
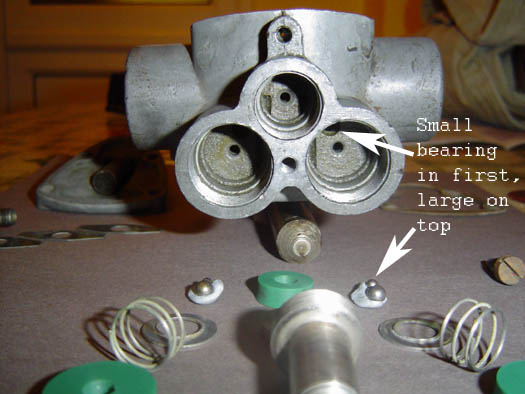
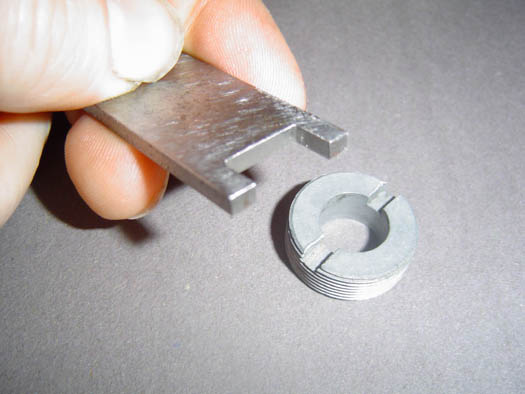
Exploded view of the Jackall pump | |||
 |
 |
 |
 |
 |
 |
 |
 |
Then, this year for some reason I thought it was about time for me to take the pump off the car and dismantle it to see if I could find out where the three little seals should go (as they were not supplied with any sort of instructions or diagram). Probably the best thing here is to rely on the fact that a picture is worth a thousand words and advise you to look at the photos of my exploded pump. A few points to note on dismantling the pump are:
When removing the front plate make sure you do not damage the gasket.
Do not lose any of the ball bearings or you'll be swearing for days — there are two under the emergency pressure relief leaf spring under the front plate, and a big one on top of a small one on each side of the pump accessed under the front/rear selection valves. (These are in blue-tack in my photos to prevent described loss.)
On removal of the "sleeve" that sits around the main release valve pin (best achieved by putting the two nuts back onto it and locking them against each other in order to unscrew) do not be scared to use a small screwdriver or something to flip out the fat copper washer that sits on top of the old seal. Due to the large amount of gunk in my pump it took me a couple of days to build up enough courage to jab a screwdriver in there as it really looked like it was all part of the pump casting and I did not want to cause any irrevocable damage.
Make sure you put the new seals (green items in the photos) in up the right way — grooved sides facing downwards to sit over the springs.
The front and rear selection valve pins should just pull out.
In order to unscrew the tops of the front and rear selection valve "sleeves" I made a special tool — see photos.
My pump was full of thick brown gunk. I am not sure as to the origin of the gunk — perhaps the wrong fluid (brake fluid) had been previously used in the system and it had caused the seals to deteriorate and produce the gunge. Anyway I spent a fair amount of time cleaning up the pump and all the bits and pieces using WD40, before a final clean with mentholated spirit prior to re-assembly. When I took out the old (black) seals I found them to be much softer that the new ones and in a generally poor state.
When I put my shiny pump back on the car and re-filled the system with oil I was (as you can no doubt imagine) more than a little disappointed to find that all my hard work seemed to have made no difference whatsoever. The rear jacks did not move at all and the front ones just did not have enough oomph to get the wheels off the ground.
As there were no leaks from anywhere in the system I thought that the emergency pressure valves might have been releasing at too low a pressure due to a weak leaf spring, allowing the fluid to run back to the reservoir whenever the pump came up against any resistance. So I drained the oil (again) and took the pump apart (again) and just so I could be sure to take the leaf-spring out of the equation I put a washer on top of the spring, under the screw. This meant that only the very ends of the leaf-spring would be able to flex and it would therefore require a much higher pressure for the two balls bearings to push out against the spring.
Surprise, surprise this made no difference at all. By this stage I was pretty frustrated and it was while taking my frustration out on the pump I discovered that if I pumped it back and forth really fast, like a lunatic, then I could get the front wheels off the ground. Hoorah!
I thought therefore that a similar action may be required to budge the rear jacks so I switched the selector to "rear" and pumped like I'd never pumped before! All I succeeded in doing was to produce a comical, cartoon-style bulge in the flexible hose leading to the rear jacks. This hose had also started to leak and was dripping oil, so before it popped I released the pressure. I had also disconnected the joint at the top of one of the rear jacks just to prove that the problem was simply that the oil wasn't getting through, and sure enough it did not even drip.
I bought a new flexible hose from NTG (only to subsequently find that the register could have supplied me with a refurbished exchange one for half the price), and was pleased that it resulted in oil clearly now reaching the rear jacks (more on the garage floor). When I re-connected the joint at the jack and pumped, both the rear jacks finally came to life and the whole car could then do a fair impression of Chitty Chitty Bang Bang, as long as I pumped like mad.
I left the car jacked-up overnight and by the next morning it hadn't dropped at all, which I figured was a good test of all the seals, valves and joints in the system. The only remaining issue was the ferocity required in pumping in order to get the car off the ground. After changing the fluid to motorcycle fork oil with no effect I concluded that this was just something that I could (and would have to) live with — I mean after all it did now work!
With my limited understanding I think the reason for the required rapid pumping rate must be due to the pistons being slightly worn and not fitting perfectly in the pump casting and that the fluid escapes back round them when pumping slowly against high pressures. If the problem was with any of the seals or valves leaking then surely the car would have a tendency to sink when left jacked-up over night. If I am right then I guess there is a chance that using a thicker oil might improve things slightly, but for now I am happy to leave alone.
As a footnote, check that the breather hole in the Jackall reservoir tank lid is clear. If you have just renewed your transfer set, or it is blocked with gunge, it will need to be cleared. It is located in the middle of the lid, and can be cleaned out with a piece of stiff wire. This hole lets air in (and out) as the fluid is pumped from (and returned to) the reservoir.
 Please do not hesitate to email me with any further queries if you think I might be able to help. I am also happy to loan out the "key" I made up for unscrewing the tops of the front/rear selection valves as long as all the postage costs are covered.
Cheers,
Saul, self-proclaimed King of the Jackalls.
Note: Any opinions expressed are solely those of the author and do not necessarily reflect those of the International MG Y Type Register.