|
End of Menu Items |
Y 6486 - Rear Shock Absorber conversion 
By Gilles Bachand
Before reading this, you must first read what Richard Prior has written on the subject. The following information is complementary.
The shock absorbers I used are KYB Gas-a-just #552-018: available from minispares.com They seem to have been recently discontinued as they do not appear in KYB's current catalog. However, many Classic Mini parts suppliers still have them in stock.
 |
Their characteristics are:
|
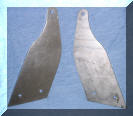 I asked a talented machinist to laser cut the upper mounting bracket from Richard's drawing and in 3/8 inch steel. They do not need to have an opening in them when designed for a YA. The emergency brake (hand brake) cable follows a different route from a YB.
 I then designed new lower mounting brackets which would replace the stock Lower Spring Saddle Plates.
This is the rough sketch I sent to the machinist.
All dimensions are in inches. These pieces were laser cut. To ensure that the 3/8 bolts I would use could comfortably fit in the holes, they had the latter be cut 0.010 inches bigger. This is not necessary if your parts are prepared in a more traditional fashion.
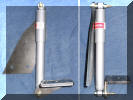 When assembled with the shock absorbers, the parts looked like this:
I used Grade 8 bolts, 3/8 inches in diameter and with fine thread (24 per inch).
They are 4 inches long to attach the upper bracket to the frame and 3 inches long to attach the shock absorbers to the brackets.
In both cases, the threaded section is a bit too long for our needs. The reason I chose those lengths is that the non-threaded section is present where the shock meets a bracket or when the upper bracket meets the chassis. This provides maximum shear protection.
A few washers were used to avoid the shock absorber body being too close to the brackets.
Those bolts can be torqued to 30 ft/lb. (Remember, these are Grade 8 bolts)
 The next thing to think about is that you must redesining the rear axle rubber bump stops. Maximum shock absorber travel is 4 1/4 inch. When mounted on the car, the shock
absorber must not be allowed to hit its limit or else it might self-destruct. Therefore, I reduced its travel by 1/4 inch in either direction by having the rear axle reach the rubber bump stops that much earlier. The lower rubber pad is now 1/2 inch thick. As for the new upper rubber bump stop, look at the difference with the original one:
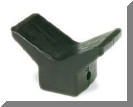 I sculpted the new bump stops from a bow rubber stop used on a boat trailer:
I glued the new rubber parts on the existing steel straps with an extraordinary glue named E6000. You can read more about it here: http://www.eclecticproducts.com/e6000_retail.htm I bought a 3.7 oz tube on Ebay for $6.
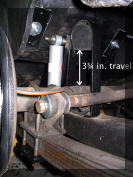
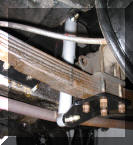 Please note that this measurement is such when the rear axle is resting on the lower bump stop.
It is recommended that you change the U-bolts whenever you work on the leaf springs, particularly if they are old, because they will have stretched and been submitted to much stress already. I have ordered a new set from NTG.

