|
|
|
|
|
|
|
|
|
|
|
|
|
|
|
|
|
End of Menu Items |


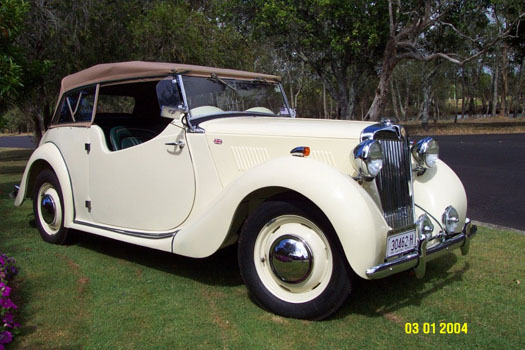
YT 4265 - a restoration 
How & why it happened
I guess this story starts in the early 80's. The Ballina Vehicle Restorers Club had just been formed and I was a foundation member but had no vintage or classic vehicle – most important if one is to really feel part of the old vehicle movement. I had always had a real desire to own an MG TC but even then this marque was beyond my moderate means. Through word of mouth I heard about an MG YT located in Parkes some 600 miles away. I didn't know what a YT was but a little research revealed it was a 4 seater MG tourer with MG TC mechanicals – somewhat over simplified but somewhere near the truth. The rest is history and after much effort YT 3779 was restored and in 1985 was placed 1st in her class in the MG Nationals.
For reasons I won't go into the car was sold with me being totally convinced that this was a finished chapter in my life and I would never be the proud owner of another YT – even so I never stopped furtively following the for sales in the various club magazines. Then, lo and behold, in the August 1995 issue of "Hit the Road" (the newsletter of the Central Coast Historic Car Club) the following add caught my eye: MG Y Tourer...ring D.Chant ...(AU)$6000 o.n.o. ... ring 065 599212.
An immediate phone call without much thought gave the response that "the car is probably sold but anyway I am going into hospital for an operation and can't do anything yet".
Not expecting to ever hear from Des Chant I sent him a get well card and some photos of YT 3779. A few weeks later I received a phone call – "the YT is yours if you still want it."
The deal was done over the phone sight unseen and YT 4265 was mine with only the knowledge that she was totally dismantled and Des had done a lot of work on her.
My mate Tom Shepherd and myself headed off to North Sydney with car trailer in tow and loaded up 4265 – totally stripped resplendent in patchy grey primer and rust along with numerous boxes of bits and pieces (all not labelled), motor, gearbox, instruments, hood, side curtains, bumpers etc. ... All this was tempered by the knowledge that Des had done considerable work on the car such as new sills, new firewall, new boot and spare wheel compartment. This he had undertaken at Tech while he was doing a panel-beating course by loading the car onto a trailer and taking her to Tech once a week and working on her. This all sounded great (how wrong can you be) but it was impossible to properly assess the work or tell if anything was missing from the assortment we carted away. More about this later!! Unfortunately I have no photos of my acquisition as the jumble was hard to photo.
At this time I was still working and YT 4265 went into storage for a little over 6 years until I retired. The motor was reconditioned during this period and I began sourcing the bits which were obviously missing. Then in October 2002 I retired and the restoration was able to commence in earnest. Much of the work on my previous YT was done professionally but not now being in the workforce with no income other than my superannuation, I resolved to tackle as much as I could myself other than the trimming. This would of course mean some reduction in finish quality as I was certainly not a proficient panel beater or spray painter but I felt would be compensated for by the satisfaction of personal achievement. This was a much bigger task than I expected as the cars bodywork proved to be fully representative of years of exposure and its early history of competition work – especially demanding trials over some of Australia's rough outback roads.
The pre-restoration stage
The motor, gearbox and clutch were reconditioned between the time of my acquisition and when I retired. These works included:
- Bore and re-sleeve No 1 cylinder, hone block, polish crankshaft, new rings, new timing chain, recondition head including new valve guides.
- New bearings & seals in gearbox, substitute parts from spare gearbox, manufacture new layshaft, new clutch, repair clutch throw-out shaft and bush bell housing.
- The camshaft was also re-profiled, the head skimmed and ported and polished and valves reshaped and polished by Waggott Cams.
- A modified rear crankshaft seal utilizing a modern lip seal was fitted to obviate rear end oil leaks. Unfortunately the sump had been so badly damaged throughout the cars previous life that extensive welding repair was necessary and I am still repairing pin hole leaks in the aluminium sump which were not detected at the time of the major repair .
Over this period of minor activity I tried to sort out what I had in all the assorted boxes of bits and began sourcing what was obviously missing from swap meets, the MG Centre in Sydney and NTG in the UK. It was not until I commenced restoration in earnest that I discovered the Y Type Register and it's excellent web site on the net – thus giving access to Y type enthusiasts worldwide, their knowledge and help in finding spare parts.
Some parts were also re-chromed during this period.
Restoration begins in earnest
The day finally arrives and I am fully retired!! Time to start the restoration. This I thought would be a snack bearing in mind the fact that much of the body work was already completed, the fact the motor and gearbox were now reconditioned and I had a fairly good shed for a workshop and a reasonable selection of tools and equipment including welder, compressor, spray gun etc.
What I lacked in the necessary skills I hoped would be made up for by stacks of enthusiasm and what I had learned and hopefully remembered from the restoration of my former YT - how wrong or how optimistic can you be?
Also in my restoration arsenal were two essentials: a Factory Workshop Manual and a copy of "Let there be Y's " written by David Lawrence. Anyone contemplating the restoration of a "Y" without these is truly an optimist, particularly if the car is a basket case as was YT 4265.
Full of optimism and a desire to see 4265 once more shipshape I donned the overalls and got into it.
My first task was to remove the body from the chassis to give access to the chassis – this was easy as it had obviously been off before during the restoration works already completed and the fact that the car was completely stripped of all components. The body was laid on the garage floor behind the chassis and the chassis was cleaned down and painted - this was not terribly demanding as Des Chant had obviously broken the back of this work some 7 or so years before. Of interest is the fact that prior to removal of the body from the chassis braces were fixed across the door openings to ensure that the tub would not bend in the middle. These were left in place until the tub was finally bolted to the chassis.
Following this the first task was to carefully sort through the jumble of bits and pieces and attempt to identify the components and store them in some semblance of order so that I could lay my hands on them as required. As part of this process the various parts were cleaned and de-rusted. Fortunately I owned a degreasing bath which helped immeasurably. Rust removal involved a combination of wire brushing using a circular wire brush mounted on one end of my bench grinder A wonderful time and effort saver but be sure to protect your eyes with safety goggles as numerous bits of flaky rust and small pieces of wire from the brush continually fly off. This rust removal process was augmented by soaking rusty components in a 10-1 solution of molasses and water. This involved placing the rusty parts in a large fibreglass vat for a period of about 2 weeks. Miraculously rusty parts came out shiny clean but it was essential to thoroughly clean the parts and paint before rust reappeared. Most of these items were recoated with an epoxy black paint that did not require pre-priming.
The chassis & running gear
Front and rear suspension components were checked and replaced as necessary – shock absorbers were unearthed and caused me some confusion as I had far too many components including telescopic shocks and brackets that had been a one time fitment on the rear (supported by the holes that had been cut in the body under the rear seat – I guess to allow travel for the telescopic shocks?). There were also a pair of rear lever type shocks more heavy duty than the originals with shortened arms so they could be fitted to the Y. All of this supported the fact that the car had been used extensively in trials and competition in it's past life. I fitted the original type rear shocks to the rear and the front suspension. I departed from original specifications by fitting auxiliary telescopic shocks to the front suspension. I used this modification on my previous YT and also a fairly warm little Morris Minor I had restored and it worked well on both of these restorations.
The back axles proved to present a real conundrum – at some time a strange assortment of a polyurethane sleeve and retaining spring had been fitted to the axles – definitely not standard – maybe a previous attempt to prevent oil leaks. I consulted Fred Magnay, a retired mechanic friend with years of experience, member of our local car club and a near neighbour but he could throw no light on this modification so it was discarded. Time will tell if it was necessary.
I managed to find the brake cylinder and master cylinder in the assortment of bits and pieces in the boxes and gave them to a specialist to re-sleeve and re-rubber. Excluding some springs and brake drum retaining screws I found the remaining brake components including a new set of brake linings and rivets. These parts were cleaned up and I fitted the new linings to the shoes with brass rivets and assembled the components on the chassis. Some of the brake hydraulic lines were badly corroded so new ones were made and fitted to the chassis along with new flex hoses and brake line fittings such as banjo joints which were missing and had to be sourced. Then followed several episodes of bleeding the brakes until all leaks were found and rectified and finally a hard pedal was obtained and retained.
The lateral control link was refurbished and fitted to the chassis with new rubbers as per the workshop manual instructions.
The fuel tank was cleaned and tested for leaks as somewhere in the past it had been the victim of some brutal treatment as evidenced by several dings. Two small leaks were found and repaired by soldering with a soldering iron (no flame). The fuel tank was then fitted to the chassis – a lesson well learnt during my last YT restoration as on that occasion I had replaced the body on the chassis before fitting the fuel tank – a bad mistake as it can't be done.
The steering rack was cleaned, painted and checked and fitted to the chassis with new rubber boots - I have used a mixture of grease and 140 grade oil in the rack – any comments on this would be appreciated.
In with the motor & gearbox
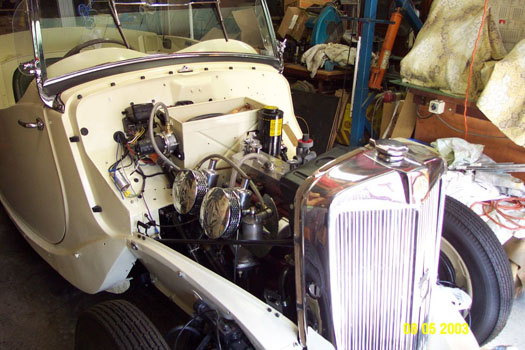
Now was the time to fit the motor and gearbox which had been reconditioned some 5 years ago. They were mounted on new mounts and the engine steady bar fitted and adjusted. All ancillaries such as carburettors, water-pump, generator, starter, oil filter etc. were fitted as well as a new exhaust system. Here I deviated from standard by fitting a larger tail pipe. All of this was very straight-forward, and I was now the proud possessor of a restored rolling chassis - being totally unaware at this juncture of the dramas in store for me. I don't have the original oil bath air cleaner so I have fitted two nice pancake filters which are embossed with the MG logo. I find these are more convenient for tuning than the oil bath cleaner.
The body
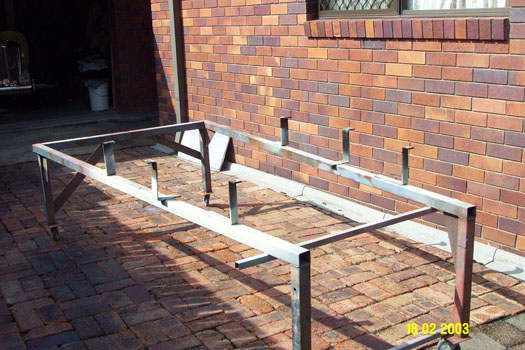
Through the "Y" web site I met Geoff Meller another Y enthusiast who was restoring a YT. As it turned Geoff lived near Grafton only about 140 km from Ballina. Geoff was further ahead with his restoration than I was and offered me the loan of a trolley he had fabricated to mount his YT body on during it's restoration. This trolley is really excellent and facilitates body work and painting of the tub. It consists of a frame with mounting brackets to match the mounting points on the chassis and body. The whole contraption is mounted on 4 castors situated at each corner of the frame. Thus as well as raising the tub one metre above the floor it is very easy to move around while working on the body, particularly good if working in a somewhat confined space.
What I should have mentioned was that before installing the engine and gearbox in the chassis I bolted up the unrestored body to the chassis and fitted mudguards and doors to check that they all bolted together OK. Just as well as the doors were an abomination of a fit. As far as I can tell the problem goes back to the new sills that were fitted to the car before I acquired it. The door gaps were not correct and for some reason were skew whiff resulting in very poorly fitting doors. I was not about to remove the sills and try again and besides which I did not have enough expertise to undertake such a task so I decided to make the best of a bad thing. After much packing of the hinges, trial and error and some bending under a 25 ton press the result is passable.
By way of comment if you follow the manual and try bending the hinges with a wooden block behind them you'll pull the side out of the car before the hinge bends – this may work with a sedan body but certainly not with a tourer body.
I also discovered that some of the fouling was due to warping. This was fixed by fixing a strip of metal diagonally across the door into which I had fitted a small turnbuckle. By tightening the turnbuckle the warping was removed and a much better fit was obtained.
I am still not totally happy with the fit of the doors but it's as good as I could get it!!
The guards fitted well but the running boards posed a problem as when the new sills were fitted no provision was made for the captive nuts that are used to bolt the running boards to the sills. Holes were drilled in the sills at the appropriate places an a modified modern mudguard bolt was welded into the sills – Lord Nuffield would probably shudder but it is hidden so no one will know the difference.
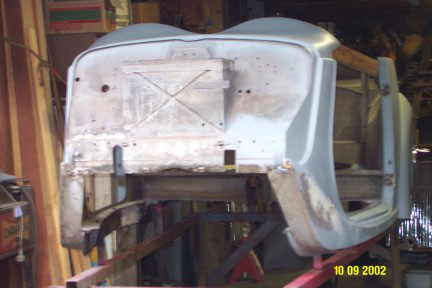
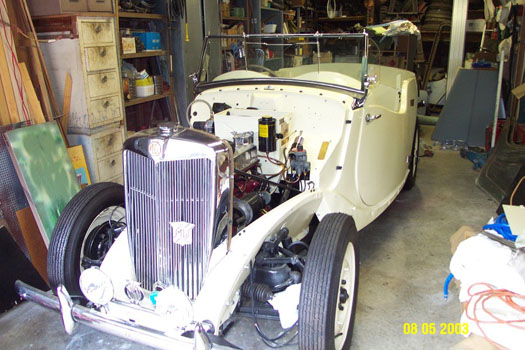
Having made sure that every thing would bolt together satisfactorily the body, guards, sills and doors were dismantled, the body removed from the chassis and mounted onto Geoff Meller's trolley. The hard work now began. Rust and paint were removed mechanically and the repair of guards, doors and sills began. As each component was repaired it was undercoated and numerous coats of spray putty were applied followed by sanding to get as good a surface as possible. Even so the finish is not really comparable to a professional job – but I have the satisfaction of personal achievement. Spray painting was carried out in the open air on still fine days as I do not have the luxury of a spray booth. The body was first and was sprayed on the trolley. Body colour is sequoia cream mixed to the original formula. The manufacturer of the originally specified tints was no longer producing them but was very helpful in advising modern substitutes. Paint is acrylic lacquer. The underside of the tub was painted gloss black followed by an application of black body schultz which is fairly chip resistant and a rust preventative. The inside of the boot was painted black. The tub was then placed on the chassis with insertion thick rubber placed under each mounting point and bolted down.
At last I was starting to get a little more room in my garage and could actually see a little floor space and had a little room to move!!!
Guards were painted one at a time and bolted to the car. This is a fairly awkward process on ones own but with the use of a floor jack to support one end of the guard and lots of old blankets it was managed without scratching them. The mudguard piping was made up by my trimmer using sash cord and the green vinyl which was to be used on the internal trim – not original but I think it looks smart. The piping was inserted before I tightened up the guards. I cut out a section a little larger than the bolts instead of punching holes to match, and in this way was able to hold the piping in place while bolts were tightened. A bit tricky, but it had to be dead right, as it would affect the finished appearance if not right.
The running boards came next, but first I added new formers and rubber strips sourced from NTG. The formers were attached using small nuts and bolts but in hindsight I think I would use pop rivets if tackling this again.
The doors were next and were painted and fitted to the car using the hinges and packing that had previously been sorted out. I letter-stamped the hinges before having them re-chromed so that the I could be sure they went back in the right spots which I had so painstakingly determined before.
The boot lid and spare wheel cover were repaired and painted and fitted to the car. This in itself proved difficult as previous replacement panels to repair the rear of the car where it had rusted took quite some work to allow the boot and spare wheel cover to fit reasonably well.
Before fitting the radiator and surround the radiator was re-cored and the surround re-chromed. The radiator slats had to come apart as it was not possible to polish them if still in the assembled. They consisted of 26 separate parts riveted together and I had no option but to drill all the rivets out and after plating re-assemble using pop rivets. The end result looks just like a bought one.
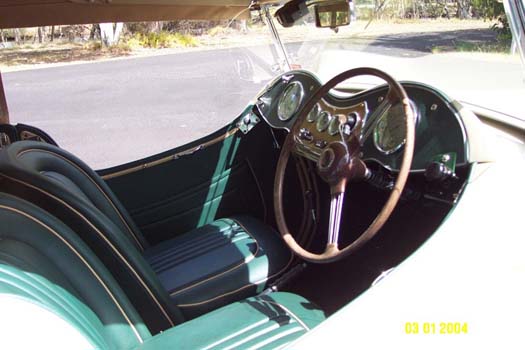
While all this was going on the instruments were sent to the Bill Ritchie at Olympic Instrument Company in Sydney for refurbishing and repair. He did an excellent job and they were fitted to the dash panel which had been recovered in the green vinyl to be used for the trim. The behind dash wiring loom was still in good condition so the panel was wired prior to fitting it in the car. I had purchased a new wiring loom but unfortunately this was for a Y sedan and did not include the small loom for the YT dash. I laid out the loom under the car and proceeded with the wiring which all went swimmingly with the exception of the stop lights. This proved to be a problem with the switch and was subsequently replaced with a hydraulic switch obtained through the Y Type Register.
Start the motor & try the gearbox
I was now ready for the moment of truth – see if the baby would start. The motor and gearbox were filled with the appropriate lubricants, the oil pump primed and the battery installed. With fingers crossed I pulled the starter switch – success it roared into life after a couple of turns of the motor. My elation however was short lived – no oil pressure showed on the gauge. The line to the oil pressure gauge was checked and found to be free, the pump was reprimed in every conceivable way and as the gauge had been reconditioned this was assumed to be OK. With panic rising I called for help from my old mechanic friend, Fred Magnay. Fred repeated all the checks I had taken including a check of the pressure relief valve and finally concluded it must be the oil pump. No option but to take it out - a job easier said than done as the motor has to be jacked up to allow the oil pump to be precariously eased out between the motor and chassis. The pump after being removed was pulled apart and inspected but showed no sign of any problem. Fred was scratching his head and when I about to re-assemble the pump he said "give that so and so thing to me - there's no hole in the gasket ". It turned out that the gasket in the pump did not have a hole at the suction gallery. When the motor was reconditioned the gasket must have been made incorrectly - a trap for tender players. Re-assembly saw 60-70 psi oil pressure when the engine was started - a big sigh of relief from me.
My mechanical dramas did not end there. The next thing was to engage the gears and check that the clutch and gearbox were OK. Start the motor, push in the clutch and engage a gear. No go just a loud grating noise from the gearbox. Over the 5 years elapsed since reconditioning the flywheel had stuck to the clutch plate. All recognised means of loosening it were tried to no avail. No option but to remove the gearbox and free the clutch. This was a step backward but necessary. Re-assembly saw it working fine – another sigh of relief.
As stated earlier I am still having problems with the sump leaking despite the fact that it was supposed to have been repaired and tested. I have been persevering with this and repairing the holes by drilling and tapping the sump and inserting a small bolt with liberal quantities of Devcon. This appears to work but of more concern is the fact that the front seal which I had modified has sprung a leak. I have replaced the seal once but it still leaks. I am now about to replace the sump and timing chain cover and revert to the standard front seal arrangement. Fortunately I was able to obtain another sump through Alf Luckman and hope to fit it shortly. All this is very frustrating, as I had paid professionals to repair, fit and test the sump as well as doing the modification to the seals.
Here I can recommend the modification to the light bar as detailed by Alf in the "hints and tips" section on the Y type Register web site. This modification significantly reduces the time to remove the radiator and I modified my light bar last time I had the radiator out.
Back to the restoration saga. New floor boards were made from formwork ply and I fitted new black carpet which I bought from NTG. These were an excellent fit and can be recommended to any "do-it-yourself" crank. I cut out new backing boards for the doors and internal trim making sure that they were a snug fit by actually fitting them to the car and marking the outline before finally cutting them out. These were given to the trimmer along with the remains of the original trim . He did an excellent job and I brought them home and fitted them to the car.
Trim,hood & side curtains
I had originally hoped that an old trimmer friend, Tom Shepherd,of mine would do the trimming as he had trimmed my previous YT and being from the old school knew the ins and outs of the old trimming methods. Unfortunately ill health did not permit this but I was lucky that Bill Gough who had trained as an apprentice under Tom set up business in Ballina. He is also an excellent tradesman and I know that Tom was looking over his shoulder. I would recommend him to anyone for this sort of work and apart from that he is a nice bloke. My budget would not allow me to stretch to leather trim but the vinyl I used has an appearance like leather even if it doesn't smell like leather.
I had the windscreen frame re-chromed and in my impatience during assembly I forgot to put the wiring in the frame that supplies the wiper motor . A trap for young players and a real pain in the backside as the assembly requires more than 2 hands to juggle the frame, the glass and the sealing rubber.
The hood bows were straightened, rivets replaced where they had become sloppy and painted along with the side curtain frames. A new timber tacking strip was made for the front of the hood bows and the lot along with the car was taken to the trimmer to have the hood, side curtains, hood bag and tonneau cover made and fitted. I used a tan hood material which I had imported from America as the original salt and pepper material is no longer available. I am more than satisfied with the result.
What now?
I had the car registered on Historic Club registration at the end of December and am working on doing the finishing touches and fixing my oil leaks.
Along with my wife, Geoff Meller and his partner we are planning a trip to Warwick (Australia) in Easter to attend the MG National meet where we will enjoy the company of other MG enthusiasts.
And there is the story of my restoration saga, one that had its trials and tribulations but has reaped a lot of satisfaction to me. Out of the experience there is only one word of advice I can give potential restorers – do not start with a car that is in pieces as it is impossible to assess from boxes of bits what is or is not missing.
Still a little more to do – but do you ever fully complete a restoration ?
Finally I would like to acknowledge the assistance given to me by the following:
Geoff Meller for the loan of his trolley, his advice and his help with parts.
Alf Luckman for advice and help with parts
Also all other members of the Y Type Register who helped with advice and sourcing parts.
Fred Magnay for his help when the going got tough.
Bill Gough ably guided by Tom Shepherd for the trim.
Linda Pastfield from NTG who always promptly and courteously assisted with the supply of parts.
And finally my wife, Toni, for her patience and understanding.
And apologies to anyone I have forgotten.
David Ardill
Click here for a PDF version of this page (505kb).
Click here to go to YT 4265 - a sporting heritage